NiftyVT Posted March 23, 2020 Author Share Posted March 23, 2020 Decals and weathering are the next steps. 20200323_122007 by nifty, on Flickr walter h, RolandTHTG, Magos Takatus and 2 others 5 Back to top Link to comment Share on other sites More sharing options...
Bjorn Firewalker Posted March 23, 2020 Share Posted March 23, 2020 The Knight looks most promising. Link to comment Share on other sites More sharing options...
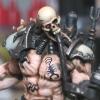
NiftyVT Posted March 25, 2020 Author Share Posted March 25, 2020 Castigator complete. 20200324_204946 by nifty, on Flickr 20200324_205021 by nifty, on Flickr 20200324_205039 by nifty, on Flickr 20200324_205051 by nifty, on Flickr And a close up of Bob. Forever condemned to dust off skulls with his little brush. 20200324_205143 by nifty, on Flickr 20200324_205200 by nifty, on Flickr Bouargh, Focslain, brother_b and 4 others 7 Back to top Link to comment Share on other sites More sharing options...
Bjorn Firewalker Posted March 25, 2020 Share Posted March 25, 2020 Great job! The base looks great, but who piled up all those skulls, and why? The Knight isn't standing on a mound a Khorne worshiper erected to honor the Blood God- one that can potentially corrupt him- is he? Link to comment Share on other sites More sharing options...
NiftyVT Posted March 25, 2020 Author Share Posted March 25, 2020 (edited) Great job! The base looks great, but who piled up all those skulls, and why? The Knight isn't standing on a mound a Khorne worshiper erected to honor the Blood God- one that can potentially corrupt him- is he? Well, it is a Knight from House Malinax and carries the mark of Scoria. . .so. . .yeah. . . he is full on corrupted already. Who knows what is piloting it. Edited March 25, 2020 by NiftyVT Link to comment Share on other sites More sharing options...
NiftyVT Posted March 25, 2020 Author Share Posted March 25, 2020 (edited) I like to lift the creative curtain so to speak with how I build things so here are some progress shots of the base. I used thick brass rod to pin the fallen pillars through the cork and into the resin base. The cork is not required to support the knight. I cut the cork and fit each skull. Some skulls are cut in half or into other sections in order to puzzle them together around the mound. The knight has 2 small pins going into his toes on the raised leg and 1 large pin going into the bottom of his foot on the flat leg. Assembly of the knight and attaching him to his base was done with 5 min 2 part epoxy. Skulls and cork were secured with standard super glue. 20170625_120159 by nifty, on Flickr 20170625_123209 by nifty, on Flickr 20180227_182740 by nifty, on Flickr I then laid down base colors with my airbrush and then painstakingly applied GW texture paint between all of the skulls. This was a 2 brush procedure. 1 to push the texture paint around and then a clean damp brush to wipe any mistakes off the skulls/base. P_20181104_185936_vHDR_Auto by nifty, on Flickr Once I finished dry brushing the textured paint I painted all of the skulls by hand. Edited October 10, 2021 by NiftyVT Focslain, RolandTHTG, Magos Takatus and 3 others 6 Back to top Link to comment Share on other sites More sharing options...
Magos Takatus Posted March 25, 2020 Share Posted March 25, 2020 The base for that knight is phenomenal. The Castigator itself is pretty awesome too. Great work. :) Link to comment Share on other sites More sharing options...
NiftyVT Posted March 25, 2020 Author Share Posted March 25, 2020 The base for that knight is phenomenal. The Castigator itself is pretty awesome too. Great work. Thanks, the base was a progression into madness. For my first knight I just used the GW base and put some skulls sunk in the sand. Then for my Acheron I got a little more elaborate and used a Dragon Forge base. Then I decided to add some stuff to another Dragon Forge base for the Castigator. It started with just a fallen pillar that he was going to straddle. Then it became 'well I can put his foot up on it, that would be cool.' Which turned into 'well the pillar isnt tall enough to make his stance dramatic.' So I made it taller with some cork. Then GW released the skull pack and it turned into a huge pile of skulls. Then I was like 'Well, I want this to fit in with the rest of my mech stuff so the skulls should look they had wind blown sand on them.' But then how do they and the rest of the base stay free of most sand. In came Bob the servo skull and the realization that I spent just as much time on the base as I did on the Castigator itself lol. Magos Takatus 1 Back to top Link to comment Share on other sites More sharing options...
NiftyVT Posted April 10, 2020 Author Share Posted April 10, 2020 (edited) SO bored today so. . .decided to get my fledgling Knight House Malinax out for a group picture. 2 Moirax are in work. Any suggestions for the next Knight addition? 1 by nifty, on Flickr Edited April 10, 2020 by NiftyVT brother_b, Colonel Cross and Shinespider 3 Back to top Link to comment Share on other sites More sharing options...
Focslain Posted April 10, 2020 Share Posted April 10, 2020 If you want a cheap$$ addition, some helverins would work nicely. Outside of that it depends on your preferred playstyle/aesthetic and budget. I'd say a nice melee knight, either a gallant or lancer would round the group out nicely. Link to comment Share on other sites More sharing options...
NiftyVT Posted April 10, 2020 Author Share Posted April 10, 2020 If you want a cheap$$ addition, some helverins would work nicely. Outside of that it depends on your preferred playstyle/aesthetic and budget. I'd say a nice melee knight, either a gallant or lancer would round the group out nicely. I have alternate guns in route from Taro Model Maker for my 2 little guys. Focslain 1 Back to top Link to comment Share on other sites More sharing options...
NiftyVT Posted April 14, 2020 Author Share Posted April 14, 2020 Finished up some airbrushing this morning. Now for the brush work! 20200414_123027 by nifty, on Flickr Colonel Cross 1 Back to top Link to comment Share on other sites More sharing options...
NiftyVT Posted April 16, 2020 Author Share Posted April 16, 2020 I finally got my Taro Model Maker arms in! Only thing is that they are designed to work with standard GW Armiger arms and, of course, the FW Moirax have a different arm attachment style! So I had to make some little adapters. I used some brass tube and magnets that fit perfectly inside the tube to make little spacer stick things! 20200415_115531 by nifty, on Flickr 20200415_115657 by nifty, on Flickr 20200415_115715 by nifty, on Flickr The hardest part is going to be not loosing them! Focslain, Syrakul and walter h 3 Back to top Link to comment Share on other sites More sharing options...
NiftyVT Posted April 22, 2020 Author Share Posted April 22, 2020 Time to paint trim! 20200422_111102 by NiftyVT, on Flickr Focslain 1 Back to top Link to comment Share on other sites More sharing options...
NiftyVT Posted May 4, 2020 Author Share Posted May 4, 2020 Making solid progress on everything. Doing some last little details on Scoria (ie face and other little flesh bits) then its time for oils! For Scoria i am working through a Lil'Legends vampire/monotone flesh tutorial from the Mephiston master class so there is quite a bit of trial and error and learning going on but I think his flesh is turning out well (also its good practice before I do Mephiston himself). Its my first time painting in this type of style so its a little nerve racking. . .blues and reds to paint flesh . . .madness lol. But it should be a good contrast with his black robe, dark metal trim and off white main armor color. Same for the Moirax, making good progress. I thought I finished doing the chipping and then I found an armor panel hiding behind my paint water. . .need to finish that panel real quick. Then its time for final assembly, gloss, oils, decals etc etc. But all the colors are blocked in and ready to go. I also finished up 4 armiger autocannon arms from Taro Model Maker. Just need to wait for everything else to be ready so I can do a big batch oil wash. For some reason I just ignored my 2 claw arms I bought at the same time so I need to detail them real quick. They are sprayed steel but then I just forgot about them on top of my spray booth. So, I will need to block in a few things real quick before I move into the oils. Just a little copper and scratches and such. Shouldnt take long. I am also excited about the new AdMech Dog riders and flying wing guys. The rules preview for the Talons is interesting. Says the model gets +1S if it charges or performs a Heroic Intervention . . . hmmmm. . .customizable Skitarii HQ in the near future? My plan for the wing guys is to remove the wings (dumb in my opinion) and sub in some kind of thrusters. MkII jump pack thrusters maybe? 2-3 per guy? I need to get them in hand first. Link to comment Share on other sites More sharing options...
NiftyVT Posted May 18, 2020 Author Share Posted May 18, 2020 Scoria and friends are complete! 20200518_134022 by nifty, on Flickr 20200518_134004 by nifty, on Flickr 20200518_134138 by nifty, on Flickr 20200513_183516 by nifty, on Flickr 20200513_183610 by nifty, on Flickr 20200513_183741 by nifty, on Flickr 20200513_183900 by nifty, on Flickr brother_b, Subtle Discord, Prot and 5 others 8 Back to top Link to comment Share on other sites More sharing options...
NiftyVT Posted July 1, 2020 Author Share Posted July 1, 2020 Just wiped the oil wash off. Yumm, nice and dirty. 20200701_130442 by nifty, on Flickr Prot, brother_b, Bouargh and 3 others 6 Back to top Link to comment Share on other sites More sharing options...
Magos Takatus Posted July 2, 2020 Share Posted July 2, 2020 Looking good! There is nothing boring about this drill. :p I know I've said it before but I really like that weathered metal technique you use. Link to comment Share on other sites More sharing options...
NiftyVT Posted July 2, 2020 Author Share Posted July 2, 2020 Looking good! There is nothing boring about this drill. I know I've said it before but I really like that weathered metal technique you use. I am having my usual weather powder or not debate. It will look 1000x better with it but then be a pain in the butt for playing with lol. Going to gloss coat it today (gave the enamels a good 24 hours to dry) and then do the transfers tomorrow. Link to comment Share on other sites More sharing options...
NiftyVT Posted July 22, 2020 Author Share Posted July 22, 2020 Special delivery. . .HOPLITES! 20200722_114216 by nifty, on Flickr LameBeard, Focslain and Magos Takatus 3 Back to top Link to comment Share on other sites More sharing options...
NiftyVT Posted March 30, 2021 Author Share Posted March 30, 2021 (edited) Off to the races with another Knight! Today I started posing. I cut up the legs, plastic glued the halves together for maximum strength and got out the blue tac. First I started filling the feet with green stuff for better base mount strength on one of the legs and half filled the other foot so I have a base to sculpt texture onto the bottom of the other foot. I plan on a running pose so all of weight of the mini will be on one leg. Untitled by nifty, on Flickr Next up is separating the leg sections. This was actually pretty easy. First I drilled a ton of holes in the joint from the outside. Then from the inside I stabbed my xacto blade down through each hole to separate each section. Untitled by nifty, on Flickr Untitled by nifty, on Flickr Next I glued the sections together and got out the blue tac. Untitled by nifty, on Flickr I also added a large pin on the base foot. Untitled by nifty, on Flickr And that’s where the build is at this point. I think I have a leg pose figured out. But I need to figure out how I am going to do the hip flex joints. Two options: cut off and resculpt the flex joints or cut off the flex joints and the built pistons and wires and other junk to represent a joint without the flex covers. I am leaning toward the pistons and wires. Should be cool and I can make it grim dark. Oh, and my pose inspiration sheet contains images of a super sweet warhound build by The Polysmith. Edited March 30, 2021 by NiftyVT walter h, MajorNese and Brother Desultor 3 Back to top Link to comment Share on other sites More sharing options...
Syrakul Posted March 30, 2021 Share Posted March 30, 2021 (edited) If you are going to copy the pose in those warhound reference photos you have there, would be amazing, that looks really organic and swift. Id love to make some more Titanicus warhounds like that now Really like the dirty/clean white scheme you've managed for malinax, Forgive me if you've discussed but the selective marbling you've done looks amazing, you should try that more! And yes, more weathering powders! Edited March 30, 2021 by Syrakul Link to comment Share on other sites More sharing options...
NiftyVT Posted March 31, 2021 Author Share Posted March 31, 2021 If you are going to copy the pose in those warhound reference photos you have there, would be amazing, that looks really organic and swift. Id love to make some more Titanicus warhounds like that now Really like the dirty/clean white scheme you've managed for malinax, Forgive me if you've discussed but the selective marbling you've done looks amazing, you should try that more! And yes, more weathering powders! Yeah, I am working to make the legs similar to that warhounds legs. It’s going to be a pain lol. The marble is just using an off white airbrushed through a drier sheet. Simple and quick. I did a bunch of it on my Titanicus Gore Crows. Syrakul 1 Back to top Link to comment Share on other sites More sharing options...
NiftyVT Posted March 31, 2021 Author Share Posted March 31, 2021 I finished the foot that’s going to be on the ground less the green stuff work. And I started putting tread on the foot that will be raised up. Untitled by nifty, on Flickr Magos Takatus, Focslain and Brother Desultor 3 Back to top Link to comment Share on other sites More sharing options...
Magos Takatus Posted April 1, 2021 Share Posted April 1, 2021 Wow, this is going to be a lot of work. Good luck! :) walter h 1 Back to top Link to comment Share on other sites More sharing options...


Recommended Posts
Create an account or sign in to comment
You need to be a member in order to leave a comment
Create an account
Sign up for a new account in our community. It's easy!
Register a new accountSign in
Already have an account? Sign in here.
Sign In Now