sarabando Posted January 25, 2020 Share Posted January 25, 2020 https://www.instagram.com/p/B7reJx4nMx2/?igshid=5euvj25717sd Managed to get some oils down last night ...light headed...no ventilation....white spirit....send the XIV....urrghhhh There's a lot to be said about odorless spirits if you can get ahold of them! Very much worth it on those cold days where you'd rather not leave the windows open too long :) Problem is odourless are just that odourless they are identical and have the same.effect.just with out you knowing it XD Link to comment https://bolterandchainsword.com/topic/361238-loyalty-treachery-v/page/4/#findComment-5467419 Share on other sites More sharing options...
MARK0SIAN Posted January 25, 2020 Share Posted January 25, 2020 I wasn’t sure if I should edit my first post or just make a new one to show my ‘before’ picture of my third unit so i just mad a new one. Here is my Blood Angels Praetor. Helmet and jump pack are only tacked on to make painting easier. Link to comment https://bolterandchainsword.com/topic/361238-loyalty-treachery-v/page/4/#findComment-5467561 Share on other sites More sharing options...
jaxom Posted January 25, 2020 Share Posted January 25, 2020 https://www.instagram.com/p/B7reJx4nMx2/?igshid=5euvj25717sd Managed to get some oils down last night ...light headed...no ventilation....white spirit....send the XIV....urrghhhh There's a lot to be said about odorless spirits if you can get ahold of them! Very much worth it on those cold days where you'd rather not leave the windows open too long :)Problem is odourless are just that odourless they are identical and have the same.effect.just with out you knowing it XD ^ This, so much. Here’s my take as a former chemical safety professional: Mineral spirits are always going to fume. Your best bet, if you don’t want to buy any engineered or personal protective equipment (desktop fume hood or gas mask, respectively) and can’t work with windows open, is to work adjacent to a stove top (not on!) with the blower on. When you’re done, leave the blower going for another hour to get rid of any remaining fumes because they are highly flammable. I don’t think painting minis is worth that risk - small batch work with plenty of fresh air breaks is a much better idea. Link to comment https://bolterandchainsword.com/topic/361238-loyalty-treachery-v/page/4/#findComment-5467575 Share on other sites More sharing options...
Vogon Posted January 25, 2020 Share Posted January 25, 2020 There’s been some impressive work done so far. Now the weekend is here I’ve been cracking on with the Castigator Painting in sub assemblies and armour panels then I’llput it all together. it might take me a couple more weekends to get finished but I’m slowly plugging away at it. Also I finished basing the Alpha Legion Praetor. Cheers Vogon Link to comment https://bolterandchainsword.com/topic/361238-loyalty-treachery-v/page/4/#findComment-5467577 Share on other sites More sharing options...
Captain Semper Posted January 25, 2020 Author Share Posted January 25, 2020 All right! That's what I'm talking about! The Heresy remains strong here at the B&C - and we won't have it any other way! Now let's see more people joining - especially on the Traitor side! @ Mandaloriano: I'm really sorry about your accident - it sounds horrific... Great to hear you're back to normal - good luck with it. @ Slave to Darkness: I never thought I'd see the day that StD will turn Loyalist... I wasn’t sure if I should edit my first post or just make a new one to show my ‘before’ picture of my third unit so i just mad a new one. Here is my Blood Angels Praetor. Helmet and jump pack are only tacked on to make painting easier. The idea is to get the "before" pics in the post linked to the first page so everything would be easily visible to everybody. UPDATED TO THIS POINT! Link to comment https://bolterandchainsword.com/topic/361238-loyalty-treachery-v/page/4/#findComment-5467594 Share on other sites More sharing options...
Marshal Vespasian Posted January 25, 2020 Share Posted January 25, 2020 Its yellow alright Link to comment https://bolterandchainsword.com/topic/361238-loyalty-treachery-v/page/4/#findComment-5467709 Share on other sites More sharing options...
Dwango Posted January 25, 2020 Share Posted January 25, 2020 Managed a little bit of hobby time over the last week or so. Managed to get the dreadnought bases 90% done. Link to comment https://bolterandchainsword.com/topic/361238-loyalty-treachery-v/page/4/#findComment-5467733 Share on other sites More sharing options...
sarabando Posted January 25, 2020 Share Posted January 25, 2020 aaaaaaaaand done. spoilered as requested Link to comment https://bolterandchainsword.com/topic/361238-loyalty-treachery-v/page/4/#findComment-5467750 Share on other sites More sharing options...
Slave to Darkness Posted January 26, 2020 Share Posted January 26, 2020 @ Slave to Darkness: I never thought I'd see the day that StD will turn Loyalist... Shhh dont tell everyone. :lol: Actually most of my projects this year are Loyalists, working on some Imperial Guard atm and after that a homebrew marine chapter that I can run as Templars, Blood Angels or Dark Angels depending what mood I am in. Sisters are really tempting me as well. Link to comment https://bolterandchainsword.com/topic/361238-loyalty-treachery-v/page/4/#findComment-5467776 Share on other sites More sharing options...
Semper Fortis Posted January 26, 2020 Share Posted January 26, 2020 aaaaaaaaand done. Looks like first blood to sarabando for the Warmaster. Way to go, bro! Link to comment https://bolterandchainsword.com/topic/361238-loyalty-treachery-v/page/4/#findComment-5467796 Share on other sites More sharing options...
Vogon Posted January 26, 2020 Share Posted January 26, 2020 Sarabando, congratulations on being the first to complete a vow. Nice work, the Warmaster will be proud. On to my own update. I’ve done a bit more work today, Now most of the blocking of colour is done I put the pilot in the cockpit and started assembly. Once the thing is all together and the glue dry I can start with the stuff the makes ore sense to paint once fully assembled then tidy it all up and call it done. I don’t know if I will get much done next weekend though as it’s a busy one in the Vogon household. Cheers Vogon Link to comment https://bolterandchainsword.com/topic/361238-loyalty-treachery-v/page/4/#findComment-5467973 Share on other sites More sharing options...
Marshal Vespasian Posted January 26, 2020 Share Posted January 26, 2020 Basic colours blocked in, decals applied. I'll still need to shade the off-black parts with the airbrush and then its off to gloss varnish the guy, apply streaking grim and then weather him, before matte varnishing and doing metallics. I originally had bigger fists as decals, but one of them broke, also I dont have a lot of numbers to select from so its a rather smallish number three on the squad marking, but you take what you can get. lessons learned so far: Airbrush glazes over large areas take AGES to dry, dont touch them. Airbrush glazes over large areas turn kind of glossy. Don't paint over them. Matte varnish first. Turn all your mistakes into weathering and no one will ask quetions (still to do and more of a theory, but I got TONS of sponges man) Link to comment https://bolterandchainsword.com/topic/361238-loyalty-treachery-v/page/4/#findComment-5468042 Share on other sites More sharing options...
Angel of Solitude Posted January 26, 2020 Share Posted January 26, 2020 Progress is slow, but here's a very brief update: Sabre Tank #1, all built, magnetised and ready for some paint! Link to comment https://bolterandchainsword.com/topic/361238-loyalty-treachery-v/page/4/#findComment-5468049 Share on other sites More sharing options...
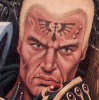
Gederas Posted January 26, 2020 Share Posted January 26, 2020 Just some highlights and then the base, and then Perturabo is done: Link to comment https://bolterandchainsword.com/topic/361238-loyalty-treachery-v/page/4/#findComment-5468111 Share on other sites More sharing options...
Gederas Posted January 27, 2020 Share Posted January 27, 2020 Sorry for the double post, but now he's done: And with Forgebreaker: Link to comment https://bolterandchainsword.com/topic/361238-loyalty-treachery-v/page/4/#findComment-5468153 Share on other sites More sharing options...
jaxom Posted January 27, 2020 Share Posted January 27, 2020 A double post! By Perturabo's dolmades! How inefficient; present your painting supplies for decimation! Seriously though, brilliant work! I love worn hazard stripes and the warm bronze contrasting the cold iron. I planning on doing a larger "here's where I'm at" post in the near future. Until then I'd love some feedback on head options for the Sergeant in the Veteran Tactical Squad. Mk4 Helmet Frowny Helmet Knight Veteran Link to comment https://bolterandchainsword.com/topic/361238-loyalty-treachery-v/page/4/#findComment-5468160 Share on other sites More sharing options...
Gederas Posted January 27, 2020 Share Posted January 27, 2020 A double post! By Perturabo's dolmades! How inefficient; present your painting supplies for decimation! Seriously though, brilliant work! I love worn hazard stripes and the warm bronze contrasting the cold iron. It's not my fault that no one else posted after me :lol: And thanks! The hazard stripes aren't supposed to be really worn, it's just I think I didn't do a second coat of Liberator Gold on them (yes, the yellow stripes are actually gold :lol:). As to the Marine.... I like the bare head to be honest. Definitely adds the 'veteran' feel to the model. Link to comment https://bolterandchainsword.com/topic/361238-loyalty-treachery-v/page/4/#findComment-5468162 Share on other sites More sharing options...
MARK0SIAN Posted January 27, 2020 Share Posted January 27, 2020 @Jaxom I would say the bare head too followed by the MKIV helmet :) @Gederas He looks really good! The eye lense in particular really seems to show some personality of the Primarch! Link to comment https://bolterandchainsword.com/topic/361238-loyalty-treachery-v/page/4/#findComment-5468242 Share on other sites More sharing options...
noigrim Posted January 27, 2020 Share Posted January 27, 2020 Finished assembly will begin painting tonight Link to comment https://bolterandchainsword.com/topic/361238-loyalty-treachery-v/page/4/#findComment-5468334 Share on other sites More sharing options...
MARK0SIAN Posted January 27, 2020 Share Posted January 27, 2020 My finished Praetor, let’s just hope he avoids instant death now :) Link to comment https://bolterandchainsword.com/topic/361238-loyalty-treachery-v/page/4/#findComment-5468425 Share on other sites More sharing options...
jaxom Posted January 27, 2020 Share Posted January 27, 2020 Excellent work with the trim and I love the gold and black helmet! Link to comment https://bolterandchainsword.com/topic/361238-loyalty-treachery-v/page/4/#findComment-5468483 Share on other sites More sharing options...
MARK0SIAN Posted January 27, 2020 Share Posted January 27, 2020 Excellent work with the trim and I love the gold and black helmet! Thanks :) it’s actually a Black Templars helmet from the upgrade kit. I took the colour inspiration from the FW Dawnbreaker models. Link to comment https://bolterandchainsword.com/topic/361238-loyalty-treachery-v/page/4/#findComment-5468511 Share on other sites More sharing options...
sarabando Posted January 27, 2020 Share Posted January 27, 2020 If I want to add to my pledge do I need to do 3 more units again or is 1 ok? Link to comment https://bolterandchainsword.com/topic/361238-loyalty-treachery-v/page/4/#findComment-5468547 Share on other sites More sharing options...
Vykes Posted January 28, 2020 Share Posted January 28, 2020 aaaaaaaaand done. Sarabando my dude, I've been following your stuff on the Cthonian Rage facebook group and it's just awesome to see it here man. Total props, it looks amazing (lots of awesome effort here! all 'round). Massive fan of the beakies in there I couldn't try to spoiler em to make em smaller. The Warmaster would be furious. Totally gonna have to add some. Well I haven't been completely dead, just mildly so. Did some work aaaaand lost track of where my bases went, so I had to place an order with GW for 30 more. Should be in within a few days. Everything' still fuzzy WIP, gotta a do the eyes, clean up the metal and leather, then bit of highlighting on the black rims and metal chipping. Volkite squad is a little further back just as I'm working up the culverins too but the troopers are at the same point. Burry pics but I'll fix it when I get them bases. Link to comment https://bolterandchainsword.com/topic/361238-loyalty-treachery-v/page/4/#findComment-5469019 Share on other sites More sharing options...
LameBeard Posted January 28, 2020 Share Posted January 28, 2020 Basic colours blocked in, decals applied. I'll still need to shade the off-black parts with the airbrush and then its off to gloss varnish the guy, apply streaking grim and then weather him, before matte varnishing and doing metallics. I originally had bigger fists as decals, but one of them broke, also I dont have a lot of numbers to select from so its a rather smallish number three on the squad marking, but you take what you can get. lessons learned so far: Airbrush glazes over large areas take AGES to dry, dont touch them. Airbrush glazes over large areas turn kind of glossy. Don't paint over them. Matte varnish first. Turn all your mistakes into weathering and no one will ask quetions (still to do and more of a theory, but I got TONS of sponges man) @Marshal Vespasian: I love how this Land Raider is looking. I hate to be 'that guy' but I'm worried the shoulders of the tank commander are meant to be glued on from the inside of the turret, so just the head pokes out? Is it too late to fix? Or do you just prefer it that way, giving him a bit more height? @Everyone_Else, especially the Warmaster's legions. I haven't forgotten my promise. I will pledge as soon as I can get pictures up. Or am I too late? Link to comment https://bolterandchainsword.com/topic/361238-loyalty-treachery-v/page/4/#findComment-5469133 Share on other sites More sharing options...
Recommended Posts
Archived
This topic is now archived and is closed to further replies.