Magos Takatus Posted November 12, 2020 Share Posted November 12, 2020 Hiya, I bought a Contemptor Dreadnought quite a while ago and decided to start work on it recently and I am at the stage where the parts are cleaned and I am looking at my options for posing. I have stuck a crushed barrel to the base and I am thinking about posing the Contemptor with one foot on the barrel. I am finding it tricky to test-fit the parts to see if the pose will work or not. I am using Blu-Tac/poster putty but it's simply not holding the parts together, and I ran out of fingers trying to hold the part in place. This isn't a huge problem but since I will eventually encounter similar problems when I assemble my Castigator Knight further down the line. How do you hold each part together? Do you glue one part at a time or try to stick the parts all together? If that's the case, what adhesive do you use? Personally, I have just be using bog standard super glue to fix my resin models together but when dealing with several parts that might need to be adjusted at the same time would you find a glue with longer curing time more useful? I do have a tube of two-part epoxy I've been saving for the Knight but should I use that when dealing with these legs? I know I'm probably making this sound more complicated than it has to be, but I just want to see if I can draw on other people's experience before I start assembling a fairly expensive model. Thanks for your time. Link to comment Share on other sites More sharing options...
Syrakul Posted November 12, 2020 Share Posted November 12, 2020 don't do longer curing time, nothing will stay at all and it will just rag-doll when you want it to set I have done 3 proper Contemptors in my time and I have a few points that might help 1. look online for other poses to copy, even if just looking at the legs first. be sure to check the terrain they are standing on etc. Now if you can see the exact angles of the knees Id mimic those first. (glue the most certain joints first, more wonky later) 2. use a slight dab of superglue first and then later when you find the pose and its built, you can snap, file and reglue strongly later. each time you still have a steady join when mucking about with other joints 3 the ball feet glue last, real lifesaver in terms of ankle position flexibility. Alternatively, if you are confident wit the spacing and foot placement you can glue or pin the feet down to the base first, to help hold the rest of the legs up while manuvering. (but dont glue ankles yet) 4. the waist: important the angle of the waist isnt too steep, or you might get an awkward tripping or falling look. Whatever you do don't go more than 15 degrees away from straight up. Magos Takatus and Firedrake Cordova 2 Back to top Link to comment Share on other sites More sharing options...
MegaVolt87 Posted November 12, 2020 Share Posted November 12, 2020 I recommend pinning it and glueing together to re-pose. The pins keep it all together for posing, and make it easier, also stronger when you glue it together. Also magnitize the arms carefully so you can switch between loadouts. Magos Takatus 1 Back to top Link to comment Share on other sites More sharing options...
Magos Takatus Posted November 12, 2020 Author Share Posted November 12, 2020 (edited) Thanks both of you for your replies. I'll bear your experience in mind. What sized magnets would you recommend for something as heavy as Dreadnought arms? I only have 2-3mm cylindrical magnets so I'd probably have to buy some new magnets. I recently treated myself to some new drill bits and some brass rod because for years I've been pinning with paper clips and the holes have always been just a bit too big. Hopefully pinning will be more useful for me in the future. I am glad I held fire on the assembly, I was going to start from the ground up on the legs but making sure the waist stayed fairly level is a priority. I made a Morkanaut before that looks like it's stumbling so I am strongly against repeating that mistake. Granted, there's not many points of articulation on a Morkanaut but I got the angle wrong and being unable to remove the bike from the base I just had to make do. I'll wait until tomorrow to see if more good advice arrives and then I'll start working on it in earnest. Edited November 12, 2020 by Magos Takatus Link to comment Share on other sites More sharing options...
MegaVolt87 Posted November 12, 2020 Share Posted November 12, 2020 5mm thin flat magnet for shoulder to arm connection, 3mmx2mm for arm. Or a bit more than 2mm depth on the 3mm magnet if you like. Just watch the polarities otherwise you defeat the purpose of magmatism of arms. eg + - on both left and right so both arms swappable on a contempor. Magos Takatus 1 Back to top Link to comment Share on other sites More sharing options...
Imren Posted November 13, 2020 Share Posted November 13, 2020 When you pin the parts together during dryfitting/dryposing I suggest you use 1 mm brass wire and drill the holes with 1 mm drill. Brass is a bit softer but strong enough to act as a pin as well as steel/iron pins. The softness allows you to ben the pin a wee bit during dry fitting so that you can finetune the pose.Drilling the pin holes 1 mm makes the pin sit tighter which allows for easier dryfitting/dryposing without bluetac. Magos Takatus 1 Back to top Link to comment Share on other sites More sharing options...
Syrakul Posted November 13, 2020 Share Posted November 13, 2020 (edited) I use gardening wire which is very soft and malleable (and easy to cut and super cheap) but should goto 1.5mm size Id worry about pinning ball joins as you cant get that 360 all direction movement if you drill the wrong angle. Also the hip join is so thin inside the hips you'd just be drilling the two leg plugs together. Agree pinning the feet to base and possibly into ankles is good idea (and pin the waist to body definitely) the hips here have a bit of open leg action you might get wrong with pins This conversion had option to drill some swivelly bits and the crows feet but had even more wonky connections to balance Edited November 13, 2020 by Syrakul Magos Takatus 1 Back to top Link to comment Share on other sites More sharing options...
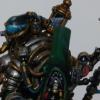
Magos Takatus Posted November 13, 2020 Author Share Posted November 13, 2020 Righto. I've got a pose I'm fairly happy with. Nothing too adventurous, just crushing a barrel underfoot. Does this look alright? The assault cannons were a pain to assemble and were a little wonky but hopefully it won't be too noticeable. I don't know if I'll buy some more gun arms for this chap. He's going to have the Cyclone missile rack so this particular one isn't going to use any melee weapons. Perhaps one day I might get a close combat dread, what kind I am not sure. Sadly the Forge World box Dreadnoughts went out of production without warning. Syrakul 1 Back to top Link to comment Share on other sites More sharing options...
Magos Takatus Posted November 14, 2020 Author Share Posted November 14, 2020 Thanks for the further clarification on the glue. That two-part Gorilla glue I got might not be the right tool for the job. As for the barrel, yeah, something as heavy as a Contemptor would probably crush a metal barrel like a paper cup and it would probably make more sense to just kick it out of the way but it's a slight variation on the "heroic rock" that so many characters are posed on now. I probably could have used an arm from a spare Deff Dread as an obstacle instead but for some reason I couldn't find the missing one in my bits box. Also, those 1.5mm drill bits and rods: Totally worth it. For the first time my pins fit snugly in the holes which I can only imagine makes the bond about 1000% more secure compared to paperclips rattling around inside the holes. This has been sitting in my cupboard for so long but I'm so excited to be working on it, I'm shocked it's taken me so long. I just have to figure out how to transfer the colour pattern from my marines to a vehicle. I will have to see if there is a file available for impcat. Link to comment Share on other sites More sharing options...
Syrakul Posted November 14, 2020 Share Posted November 14, 2020 (edited) Righto. I've got a pose I'm fairly happy with. Nothing too adventurous, just crushing a barrel underfoot. Does this look alright? The assault cannons were a pain to assemble and were a little wonky but hopefully it won't be too noticeable. I don't know if I'll buy some more gun arms for this chap. He's going to have the Cyclone missile rack so this particular one isn't going to use any melee weapons. Perhaps one day I might get a close combat dread, what kind I am not sure. Sadly the Forge World box Dreadnoughts went out of production without warning. I like that squished barrel! Looks good, just enough lean in to look secure in his footing. Wondering about the back foot; you used the toe-bent foot instead of the flat foot.(maybe you didn't have it I don't know) but if you scatter some other debris on his base, should get a bit under his toes to make it work. Edited November 14, 2020 by Syrakul Magos Takatus 1 Back to top Link to comment Share on other sites More sharing options...
Magos Takatus Posted November 14, 2020 Author Share Posted November 14, 2020 Righto. I've got a pose I'm fairly happy with. Nothing too adventurous, just crushing a barrel underfoot. Does this look alright? The assault cannons were a pain to assemble and were a little wonky but hopefully it won't be too noticeable. I don't know if I'll buy some more gun arms for this chap. He's going to have the Cyclone missile rack so this particular one isn't going to use any melee weapons. Perhaps one day I might get a close combat dread, what kind I am not sure. Sadly the Forge World box Dreadnoughts went out of production without warning. I like that squished barrel! Looks good, just enough lean in to look secure in his footing. Wondering about the back foot; you used the toe-bent foot instead of the flat foot.(maybe you didn't have it I don't know) but if you scatter some other debris on his base, should get a bit under his toes to make it work. Well spotted with the feet. I was originally going to pose the left foot on the barrel but decided that the way I stuck it to the base made it easier to raise the right foot instead. I've got some pictures of the model pinned together and undercoated. I've left the missile rack, arms, head and torso separate so I can reach all those hard to reach nooks and crannies. As you can see I added some Brazier/Torch thingies from my bits box. Sadly I cannot for the life of me remember where I originally got them from. I was planning to buy some Tartaros terminators and put them on their backs but the Contemptor ended up taking priority. Sadly the Assault Cannons didn't go together very well, trying to fit six bent rods into six holes before the superglue sticks everything to your fingers is surprisingly challenging. I can't wait to get some Gal Vorbak Red on this chap. I managed to spatter some of the grey primer onto the top of the chassis but hopefully I can clear that up. I should have gone for a slightly more detailed base but I found parts for my basing material box that had escaped so I didn't end up using them. There isn't a single skull on the base so that will need to be rectified. :) Syrakul 1 Back to top Link to comment Share on other sites More sharing options...
Magos Takatus Posted November 20, 2020 Author Share Posted November 20, 2020 (edited) Thanks for the help, here's my (almost!) finished Contemptor. I feel more comfortable posing models now, one day I'll have to get round to that Castigator Knight! Edited November 20, 2020 by Magos Takatus stretch_135 1 Back to top Link to comment Share on other sites More sharing options...


Recommended Posts
Create an account or sign in to comment
You need to be a member in order to leave a comment
Create an account
Sign up for a new account in our community. It's easy!
Register a new accountSign in
Already have an account? Sign in here.
Sign In Now