Miek Posted February 11, 2021 Author Share Posted February 11, 2021 Thanks! The NMM was so much fun to paint, I'm looking forward to my next HQ :) Link to comment Share on other sites More sharing options...
Miek Posted February 15, 2021 Author Share Posted February 15, 2021 I think I'm done with the edge highlights for the red bits, but I'm not sure if I made then too sparse. I might add some more after I'm done with those of the dark blue parts. Grotsmasha 1 Back to top Link to comment Share on other sites More sharing options...
Bjorn Firewalker Posted February 16, 2021 Share Posted February 16, 2021 I applaud your efforts and your skills. Miek 1 Back to top Link to comment Share on other sites More sharing options...
Miek Posted April 12, 2021 Author Share Posted April 12, 2021 (edited) Edit: It's unclear here but I've only worked on the cloth. I think I'll make the fur black and the skin sticky pale. I've started working on a skaven plague monk (count as plaguebearer); I have printed 30 of these and an currently trying to find a paint scheme I like. It's a yellow-brownish contrast paint base with purple shades, green midshades and ochre to screaming skull highlights. I'm not convinced about the result though, and would like to know your thoughts: I think it'd look better if green was more present in the midtones and darker highlights, perhaps by replacing ochre with a light desaturated green. I think screaming skull would still work fine as the lightest highlight, perhaps with some white mixed in at key spots. Hummmm... I think I'll try another one (after this one) with a purple-brown base (about 50/50), a zenithal green, and put highlights from there. Comments and suggestions welcome! Edited April 13, 2021 by Miek BadgersinHills and NTaW 2 Back to top Link to comment Share on other sites More sharing options...
Miek Posted May 11, 2021 Author Share Posted May 11, 2021 (edited) The first skaven from my previous post is now done and I'm getting close to completion on the next 5. They'll all have grey fur, brown-red sticks and ropes, and "muddy rainbow" robes. Of the 30 skavens in this unit, no more than 5 models should share the same robe color. The first one's was quite yellowish, as shown above, and the next 5 are purple: I would like to bring more contrast to the face and glowing eyes seems like a good idea. I think green would work well; they are plague monks, count as chaos plaguebearers, and I don't use green for my Necron army (it would annoy me to use the same "energy" color for both). I'm also interested in orange or yellow... But I think green would be better. I think that plus finishing the teeth should do the trick (enhance contrast and bring focus to the head), thoughts? Edit: here's the first one completed, if that helps (although the bottom of his robes has been muddied since this picture was taken): Edited May 11, 2021 by Miek NTaW and BadgersinHills 2 Back to top Link to comment Share on other sites More sharing options...
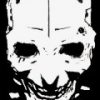
Miek Posted May 13, 2021 Author Share Posted May 13, 2021 Green it is: NTaW and BadgersinHills 2 Back to top Link to comment Share on other sites More sharing options...
NTaW Posted May 20, 2021 Share Posted May 20, 2021 Those Skaven Plaguebearers are looking great, and more firmly cementing in my mind that I need a resin printer next. I think you were right to choose a green glow for the eyes both because it's thematic for the faction and contrasts well with your grubby-but-colourful intentions for their paint scheme. Regarding adding contrast to the faces you could always experiment with mottled or wholly alternate skin colours from rat to rat. Sort of easy to randomize as well if you mix paints as you go and it isn't very much surface area to worry about. A few albinos would look fun too! Link to comment Share on other sites More sharing options...
Miek Posted May 20, 2021 Author Share Posted May 20, 2021 (edited) Thanks! I highly recommend the printer, it's so much fun. I've also decided to add some trophies to differenciate them from AoS and really make them part of W40k. My current tiny project is SM heads while watching TV with my wife, those would likely be half buried in mud at the skaven's feet: I like your suggestion about the fur, I think I'll paint the next ones 1 at a time instead of in series, and take more liberty with the colors (especially the fur). The more chaotic they look the better! It'll take longer, but it's fun and I have no deadline. Edit: Hum it looks weird, I'll have to think of something else to tie them to 40k: Edited May 21, 2021 by Miek BadgersinHills and Gore Crow 2 Back to top Link to comment Share on other sites More sharing options...
Miek Posted May 23, 2021 Author Share Posted May 23, 2021 (edited) The soul grinder conversion I'm currently working on (legs hidden). I'm planning on printing this part and playing around with greenstuff to add tendons, rot, etc. I'm a total beginner with greenstuff but I'll give it a try! P.s.: I take absolutely no credit for the models themselves, I just cut & mixed those. Edited May 23, 2021 by Miek BadgersinHills 1 Back to top Link to comment Share on other sites More sharing options...
Miek Posted May 23, 2021 Author Share Posted May 23, 2021 Yeah this is gonna be fun: BadgersinHills, Triszin and Sagentus 3 Back to top Link to comment Share on other sites More sharing options...
Miek Posted May 24, 2021 Author Share Posted May 24, 2021 Started to Nurgle it up and to better link the gun to its body. I'm a total beginner with greenstuff so C&C is very welcome: BadgersinHills, Gore Crow and Triszin 3 Back to top Link to comment Share on other sites More sharing options...
Miek Posted May 25, 2021 Author Share Posted May 25, 2021 Small update, but since I'm asking for C&C, might as well keep it up to date. I'm pretty happy with how it looks, and I hope I'll get me resin bottles soon... realized halfway through the next part's printing sessions that I was completely out. BadgersinHills, NTaW, Majkhel and 1 other 4 Back to top Link to comment Share on other sites More sharing options...
BadgersinHills Posted May 25, 2021 Share Posted May 25, 2021 I really like the GS work, well done. The mass of tentacles and sores is really quite disgusting, EXCELLENT WORK! Link to comment Share on other sites More sharing options...
Bjorn Firewalker Posted May 25, 2021 Share Posted May 25, 2021 The diseased masses are most appropriate for anything Nurgle-aligned. Your green stuff additions are well-sculpted. Link to comment Share on other sites More sharing options...
Miek Posted May 25, 2021 Author Share Posted May 25, 2021 Thanks, that's really nice feedback :) I was mostly inspired by Akira (Tetsuo) for the mass of tentacles linking the mechanical components to its body, plus a few tutoriels I scrolled through for the sores and rot. Bjorn Firewalker 1 Back to top Link to comment Share on other sites More sharing options...
Bjorn Firewalker Posted May 25, 2021 Share Posted May 25, 2021 I was mostly inspired by Akira (Tetsuo) for the mass of tentacles linking the mechanical components to its body, plus a few tutoriels I scrolled through for the sores and rot. I'm glad to know someone who appreciates the classics, instead of FALSELY claiming they promote "sexism" and then denouncing them as "problematic," as too many are doing. Miek 1 Back to top Link to comment Share on other sites More sharing options...
NTaW Posted May 27, 2021 Share Posted May 27, 2021 You could always get out your cutters and hack half the helmet off so it looks sunken into the mud, though a wider variety of body pieces would be optimal. I have an excessive amount of SM/BA bits if you find yourself with a need. Your putty work is looking the part quite nicely and Nurgle is a perfect place to start for learning how to manipulate kneadatite. That model is going to look just awesome when you're done with it. What tools are you currently using? I end up with my colour shaper, toothpick, and hobby knife most often I think. The odd round implement is handy as well. Link to comment Share on other sites More sharing options...
Miek Posted May 28, 2021 Author Share Posted May 28, 2021 Thanks, I appreciate the offer but I'll simply use my printer to make new varied bits as you suggested. And thanks for the GS feedback! I'm using basic clay sculpting tools (metal), but I think I'll get non adhesive tools soon, especially if I want smoother surfaces (non Nurgle sculpts). I'm having trouble shaping the GS without leaving tool marks with the metal ones (I'm sure it can be done, with the right control and curing time, but it's tough). Bonus pic, got a few minutes to play around before pinning and glueing the legs. The armor plates are still printing: NTaW and Bryan Blaire 2 Back to top Link to comment Share on other sites More sharing options...
NTaW Posted May 29, 2021 Share Posted May 29, 2021 Of course! Plus you could print only the portion you want instead of hacking away (though a little damage would do them good) at the bit for the same effect. Something else to consider is your ratio of blue to yellow. Upping the yellow portion slightly will give you a softer putty while more blue will be harder, likewise to their cured states. When it comes to a smooth finish you're right that a silicone shaper will go a long way. Something else I've found is try to start with a bit more than you need to you're only removing putty if (if you have to anyway). Adding some in creates a lot of work smoothing out the connection which can at times be frustrating at this scale and create weak parts if it's a small appendage or edge. When you're only taking away, typically with a real sharp and wet knife for me, you're just left reshaping the remainder which avoids any issues. When I sculpt multiple parts I'll do it in layers after the first has cured so I have more control over each piece's shape. For example in your work the thin tentacles that go over the top I'd likely do after the large ones cured so I didn't unnecessarily mush anything getting them just right. Not that I'm any guru or that Nurgle stuff needs to be so precise of course, just food for thought. Those legs look perfect, this will be a great looking Soul Grinder. Miek 1 Back to top Link to comment Share on other sites More sharing options...
Miek Posted June 6, 2021 Author Share Posted June 6, 2021 Some progress on my first 5 ratlings; just need to add some GS (pestilence) and they'll be ready for painting: Link to comment Share on other sites More sharing options...
Bjorn Firewalker Posted June 7, 2021 Share Posted June 7, 2021 Will you paint the rats, or leave them as is- looking like translucent maggots, possibly glowing with radiation, and making my stomach turn at their very sight, as appropriate for Nurgle's pets? Link to comment Share on other sites More sharing options...
Miek Posted June 7, 2021 Author Share Posted June 7, 2021 Oh I'll paint them, I've added some Nurgle bits yesterday (with greenstuff) evening and they should be ready for priming. This is just my new resin; I don't like it my usual grey one was backorder. Link to comment Share on other sites More sharing options...
Miek Posted June 9, 2021 Author Share Posted June 9, 2021 (edited) I managed to prime a few models and play with the airbrush. Next step: paintbrush! I'm pretty happy about the green under shadows, I think they're quite fitting. Edited June 9, 2021 by Miek Tallarn Commander 1 Back to top Link to comment Share on other sites More sharing options...
Miek Posted June 15, 2021 Author Share Posted June 15, 2021 (edited) Still a WiP, but I think I'm happy with where the ratlings are going. They don't really pop from their bases though, but I'm not sure if that's ok (they're just a bunch of pestilence rats afterall) or if I should make them stand out somehow. Likewise for the robotic bits; not sure if I should try to bring them forward, or keep them subtle. Thoughts? Edited June 15, 2021 by Miek Link to comment Share on other sites More sharing options...
Bjorn Firewalker Posted June 15, 2021 Share Posted June 15, 2021 (edited) Excellent and appropriately disgusting work on Nurgle's pets. Edited June 15, 2021 by Bjorn Firewalker Miek 1 Back to top Link to comment Share on other sites More sharing options...

Recommended Posts
Create an account or sign in to comment
You need to be a member in order to leave a comment
Create an account
Sign up for a new account in our community. It's easy!
Register a new accountSign in
Already have an account? Sign in here.
Sign In Now