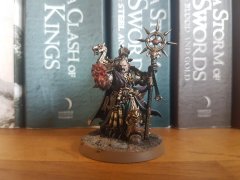
spiros14 Posted April 20, 2021 Share Posted April 20, 2021 (edited) This picture of the Imperium magazine's exclusive Primaris Captain is what has inspired me to undertake this project. I theorize that at some point in the near future, a power sword and plasma pistol combo will become an available wargear option for Primaris Captains. As I am an avid collector of the second company, and Captain Aphael is depicted with those weapons on his official model, making a rubicon'd version of the character and playing him in matched play tournaments is something I'm very much interested in. For reference, here is the model I want to capture in Primaris form. We have not seen a model representing Aphael past the opening of the great rift in the 8th or 9th edition model showcases (there are a few pictures of firstborn captains leading the blooded, but they consist only of firstborn marines, insinuating that this takes place pre-rift), but I would like to think that such a headstrong marine as Aphael would cross the rubicon to boost his own killing power. I'll be using a Primaris Captain as a basis of this kitbash, as you can see, the model already shares a lot of details with Captain Aphael already, notably the pose, the sword, the cape, and the loincloth. There are six main areas I want to work on to match Aphaels official model more. 1. The Kneepads need to be smoothed out, then cut into to that cross pattern from the official model. 2. The gun arm needs to both be moved out for a more open pose, and a weapon swap to a plasma pistol needs to be made. 3. The chest plate needs to be smoothed out, and greenstuff details applied to make the iconic nipple armour associated with the Blood Angels 4. The Backpack vents will be swapped with the eagle heads found in the firstborn commander kit. 5. This Shin Plate will have the Blood Angels chapter badge put on it to match the official model. 6. A head and shoulder pad swap from the Blood Angels tactical sprue will be made here. Like most of us, I am one of those hobbyists with three or four projects on the go at once, by making a blog here about this project I am hoping it will keep me on track to get it done sometime this year. Any comments or suggestions are always appreciated. -Spiros14- Edited November 17, 2021 by spiros14 Majkhel, Xenith, Spyros and 1 other 4 Back to top Link to comment Share on other sites More sharing options...
Helias_Tancred Posted April 21, 2021 Share Posted April 21, 2021 Kudos on your choice of project! I'm curious is that top primaris captain model a kit-bash someone made? Link to comment Share on other sites More sharing options...
spiros14 Posted April 21, 2021 Author Share Posted April 21, 2021 It's the exclusive primaris captain from hatchette's new Imperium magazine. Link to comment Share on other sites More sharing options...
Helias_Tancred Posted April 22, 2021 Share Posted April 22, 2021 It's the exclusive primaris captain from hatchette's new Imperium magazine. is that an official GW product? Pardon my ignorance. Link to comment Share on other sites More sharing options...
Spinsanity Posted April 22, 2021 Share Posted April 22, 2021 (edited) is that an official GW product? Pardon my ignorance.It's the exclusive moidel that'll be offered with Issue 5 of the new Hachette Imperium magazike - Aka Conquest v2... See http://www.bolterandchainsword.com/topic/368323-warhammer-imperium-issue-list/?p=5648684 Edited April 22, 2021 by Spinsanity Helias_Tancred 1 Back to top Link to comment Share on other sites More sharing options...
Majkhel Posted April 22, 2021 Share Posted April 22, 2021 Very nice project! Looking forward to see how you do it. Especially with all the GS-ing involved :) Link to comment Share on other sites More sharing options...
spiros14 Posted April 22, 2021 Author Share Posted April 22, 2021 Very nice project! Looking forward to see how you do it. Especially with all the GS-ing involved Thank you. Sculpting is a major drawback of mine, so it will be a big challenge for me. I intend on looking into green stuff press moulds for the most part to help me out, notably with the shin pad (A sanguinary Guard Leg has the same icon I can press mould ont the captain's leg) and the gemstone in the middle of the chest. Pete the wargamer has done a youtube video on adding power armour studs that I plan to use for the nipples. Which leaves just the lip around the chest area, which should only take a thin sausage of greenstuff to sculpt around (something a novice like me can manage). Helias_Tancred 1 Back to top Link to comment Share on other sites More sharing options...
spiros14 Posted April 24, 2021 Author Share Posted April 24, 2021 My first progress update, then. The last components for this build was delivered to me today, so I thought I would get started on the first step, which is the Primaris Captain's torso piece. I started by cutting these out and cleaning them up. I then started to smooth out the torso's original aquila and rope embelishments, to help me, I used a lump of blu tac as a handle. I found early on that the rope overhangs over a bit of the armour, meaning I had to shape the bottom of the pec area slightly, cutting a bit that holds the rope and cape to the armour was also required. I used small cuts and really took my time with this step. Everything now all smooth I can compare the Captain's torso to the firstborn template I plan on copying. Though I knew there would be a size difference, the primaris pec area is larger than I anticipated in comparison to the template, meaning that the gemstone on the template is too small for me to make a mould copy. I've made a paint diagram of what I want to do next for the torso area. First of all, I need to find a blood-drop gemstone large enough to cover most of the length between the bottom of the collar and bottom of the pecs. I'm thinking either the winged shoulder pad accessory found in the DC and BA Tactical kit, or the belt piece from the Primaris upgrade sprue. Once I have done that, I can draw the ridge at the bottom of the torso piece in pencil, and cut out the excess (the black area on the diagram) then I will glue the blood drop in place, and use green stuff to form the ridge, fill out the hole in the left pec, and add the nipples, something that will be a little difficult given that I want to get the diamond shape, size, and placement correct (no laughing in the back!) The details that I'm going to skip on translation are the abdominals and Serratus Anterior (had to google that last one!) so I can keep the basic Primaris armour shape, and reduce the pressure on my own novice sculpting abilities. The pattern on the collar will also not be etched onto the Primaris area, though it may be painted on much later, if I'm feeling brave enough. until the next one, Spiros14 Spyros, Majkhel and Helias_Tancred 3 Back to top Link to comment Share on other sites More sharing options...
BloodyB Posted April 24, 2021 Share Posted April 24, 2021 Looking very cool, and very ambitious! There are a good number of suitably impressive plasma pistols, the one from the DA upgrade sprue looks very good to me, but so does the one from the BA tac squad... Probably way ahead of where you're at now, but I can't help but start thinking about all the cool pistols available. Link to comment Share on other sites More sharing options...
spiros14 Posted April 25, 2021 Author Share Posted April 25, 2021 Looking very cool, and very ambitious! There are a good number of suitably impressive plasma pistols, the one from the DA upgrade sprue looks very good to me, but so does the one from the BA tac squad... Probably way ahead of where you're at now, but I can't help but start thinking about all the cool pistols available. Thank you, Aphael is a character I have brought to so many games that he is infamous among my hobby group, He has single-handedly taken down a ctan shard, a necron lord, and destroyer lord in single combat once, and was known to be the bane of the Genestealer Magos Lucina Vorstadt, who became the Imperiums public enemy number one on Vigilus. I want to give the model justice for games played in 9th (using the crusade campaigns in particular) and he deserves an ambitious model for his many deeds. I have thought quite hard on what weapons to give Aphael. I do want the weapons to have a fairly close resemblance to the official model, but as we've seen with Ko'Sarro Khan, Shrike, and Calgar's models, a weapon can change it's appearance after it's user goes through the Rubicon. With that in mind, my plan is to use the default Primaris Captain's sword (it shares a lot of similarities with the firstborn commander sword, down to power node placements) and the plasma pistol found in the Sternguard Veterans kit (it holds the similar shape and scope to the original, but also has a little more ornamentation on it) Helias_Tancred 1 Back to top Link to comment Share on other sites More sharing options...
spiros14 Posted May 2, 2021 Author Share Posted May 2, 2021 A small update for today. I decided it would be better for me to make a practice sculpt on the chest plate before having the real thing done. I don't think it came out too badly. Though with the amount of time it took me to get together with blu tac, I opted to outsource the actual greenstuff sculpt to a more talented friend of mine. While that is going on, I moved onto a more easier task: the backpack. The eagle heads were a must for me, a detail that matches the official firstborn model, and puts Aphael on the same backpack bling level as such rubicon'd heroes like Calgar and Ragnar Blackmane. This was a simple case of cutting the vents off of both backpacks, shaving both backpacks a little bit for a better fit, then gluing it all together. Once the torso is returned to me, my next step will be looking into the pistol arm, and some sort of assembly. Until the next one, Spiros14 Helias_Tancred and Spyros 2 Back to top Link to comment Share on other sites More sharing options...
Midnightmare Posted May 15, 2021 Share Posted May 15, 2021 This is a great project and is coming along really well. Interested to see how the torso ends up (I have been doing the same with my Sanguinary Guard and agree it’s a nightmare!) Link to comment Share on other sites More sharing options...
Majkhel Posted May 15, 2021 Share Posted May 15, 2021 (edited) A thought - i have discovered (not that recently) that some nail decorations are tear-shaped. They make excellent blood drops and are often of just the right size.The only downside is that they tend to be faceted rather than ovoid, but you can cover that to a degree with paintjob. And they are way easier to source than our blood-drop bits or sculpt by hand. Right pauldron: Chest piece, left pauldron, left greave:Hip plate: Edited May 15, 2021 by Majkhel Blindhamster, Helias_Tancred, spiros14 and 1 other 4 Back to top Link to comment Share on other sites More sharing options...
Bjorn Firewalker Posted May 15, 2021 Share Posted May 15, 2021 I commend your painting, detailing, and weathering skills. Majkhel 1 Back to top Link to comment Share on other sites More sharing options...
spiros14 Posted May 19, 2021 Author Share Posted May 19, 2021 A thought - i have discovered (not that recently) that some nail decorations are tear-shaped. They make excellent blood drops and are often of just the right size. The only downside is that they tend to be faceted rather than ovoid, but you can cover that to a degree with paintjob. And they are way easier to source than our blood-drop bits or sculpt by hand. That's a really good idea! I wish I had heard of that earlier, it would have saved me some cutting. Still, always more BA models to build So as stated in my previous post, I did pass on the sculpting of the torso piece to a friend of mine. A true hobby hero with a passion for converting many of his minis, he has surpassed my expectations. To start with, he managed to get the chest piece exactly how I wanted it. He then came to me with this concept of how the model would look with the more traditional abs. I had not expected the attempt, and fell in love with the look. However, we did note that we would experience difficulties with sculpting when you took into account the belt buckle (which I my friend did not have at the time. After a bit of plotting, we used a cut down sanguinary guard torso to get the abs right. as the belt buckle position was also important, we went ahead with assembling the legs. My friend also went ahead and did some good work with the kneepads, getting that little plus symbol on there. The last piece was the shin pad. Now, the initial idea was to use a greenstuff mould of the same decoration from a sanguinary guard leg and press that against the captain's shinplate. However, after a few attempts, my friend was unable to get that detail over, and he wasn't confident he could sculpt it himself from greenstuff. Similar to the abs, we chose to sacrifice the leg, cut the detail out, glue it onto the shin, and smooth it out. I am very happy with how the whole thing has turned out. I am lucky to have a hobby hero friend, and owe him all the beers he could ever want! To get a better idea to how this model will look further down the line, I blu-tac'd some more parts onto the model, and have taken a picture next to a regular Primaris Captain. I feel that it looks individual, but without going over the top, which is exactly how I wanted it. From here, the rest of the build will hopefully be more straightforward, and consist mainly of changing up the models right arm to hold that coveted plasma pistol, which will be the focus of my next post. Until then! +Spiros14+ Majkhel, Rhavien, Spyros and 2 others 5 Back to top Link to comment Share on other sites More sharing options...
Rhavien Posted May 20, 2021 Share Posted May 20, 2021 (edited) Amazing work! I'm curious to see the result in the end. Edited May 20, 2021 by Rhavien Link to comment Share on other sites More sharing options...
Majkhel Posted May 20, 2021 Share Posted May 20, 2021 Very nice! The breastplate upgrade shows how even a simple solution can give good results. Personally I liked the sculpted abs better. I'm sure those could have been filed down to work with the belt buckle. Alternatively, you could have trimmed/removed the buckle itself. But I can see merit in your decision too ;)Carry on! This will definitely be a really nice Aphael Link to comment Share on other sites More sharing options...
spiros14 Posted November 4, 2021 Author Share Posted November 4, 2021 Hi again!Sorry for such a long hiatus between this and my last post, I was sidetracked by other projects. I have picked this project back up, hopefully to completion, after getting the go-ahead from my buddies to use this model in crusade (I noticed that the sword and pistol combo became a legal option for Black Templar Primaris Captains, so I hope we do get an update or errata making it legal for other chapters) Since my last post, I have added a plasma pistol, made up a cork base (I don't have any other cork bases in my army, so should make this guy stand out nicely) and sprayed the torso Mephiston Red (the best colour). I plan on finishing the torso first before moving onto the other sub assemblies like the cloak and backpack. Until then! Majkhel and Rhavien 2 Back to top Link to comment Share on other sites More sharing options...
spiros14 Posted November 10, 2021 Author Share Posted November 10, 2021 Just a small update. So far I've painted the red armour, rubber undersuit, and the black detailing. For red armour I used a Mephiston Red undercoat on top of the red spray; then lined with Darkoath Flesh Contrast Paint ; then did edge highlights with Evil Suns Scarlet, Wild Rider Red, and Fire Dragon Bright. Even though both the symbol and undersuit are black, I've opted for a different scheme for each to represent the different materials (I will also be using a third scheme when it comes to painting the leather belt) The Undersuit was based with Corvus Black, washed with Basilicanum Grey and highlighted with Skavenblight Dinge; and with the black detailing (which will also include the pistol at a later point) I use Abaddon Base, then highlights of Dark Reaper, Russ Grey and Fenrisian Grey. What I'll be painting next is the loincloth, something I'm a little anxious to do as Aphael's loincloth is meant to be quite detailed, with a yellow and red stiped pattern, and a couple of small black details in the corners. I also need to contend with whatever is hanging off the belt on the waste (snack jar?). Thousand Eyes and Helias_Tancred 2 Back to top Link to comment Share on other sites More sharing options...
spiros14 Posted November 11, 2021 Author Share Posted November 11, 2021 A small update today. I spent a bit of time on the tabbard, starting with the yellow (Averland Sunset Base; Agrax Earthshade Wash, Averland Sunset Midtone; Ushabti Bone Highlight) floowed by a very careful Red lining (Gal-Vorbak Red Base; select linining with Basilicanum Grey; Khorne Red Midtone; Wazdakka Red Highlight). I also practiced the gold on the shoulder pad and chest decoration using the same scheme found on WHTV's Custodian video. (Retributor Armour; Agrax Eathshade; Auric Armour Midtone; Liberator Gold Highlight; Stormhost Silver Highlight) which I will also be using on the tabard snack jar. Admittedly I'm not too sure yet on what colours to use on the glass on the snack jar, though I think a blue-grey would be ideal. From here I will be focussing on the areas around the captain's waist, so the leather belt (black) leather pouches (brown), jam jar (gold) and some metal areas. I'll also be getting the blood drop gems done, which I will be painting purple, to match the original. Until then! Helias_Tancred, Rhavien and Majkhel 3 Back to top Link to comment Share on other sites More sharing options...
spiros14 Posted November 12, 2021 Author Share Posted November 12, 2021 Another Small update for the painting. As I said in my last post, I spent some time on the details on the armour. For the black leather belt I just used a dawnstone highlight, and for the brown leather I used Dryad Bark Base, a Basilicanum Grey Wash, and a Gorthor Brown highlight. Finally, I use Karak Stone very slightly to represent wear on the leather. The purple gemstone uses Naggoroth Night; Xerxes Purple; Slaanesh Grey; a slight Druchii Violet Glaze, and then white scar highlights. I also found the time to get Aphael's plasma pistol painted. Usually for my army's plasma weapons I use blue, but I decided on the original GW's scheme of green plasma. For that I use Caliban Green Base, Warp Lightning Contrast; then progresive highlights of warpstone glow, moot green, and skull white. I'm still having a little trouble figuring out the glass for the snack jar. I'll figure something out on maybe Sunday but if you have any ideas, I'm happy to hear them. Until then my next area to focus on is the sword, the blade of which I will be using the simple scheme as used in Warhammer TV's Uriel Ventris Video, which creates a silvered blade with a blue glow around the node, which suits my vision for the model very nicely. Until then! Majkhel and Helias_Tancred 2 Back to top Link to comment Share on other sites More sharing options...
Paladin777 Posted November 13, 2021 Share Posted November 13, 2021 For the 'snack jar' I suggest khorne red, wazdakka red (I think), followed by evil sunz scarlet, topped with warpstone glow technical paint. It makes for a wonderful glass look. spiros14 1 Back to top Link to comment Share on other sites More sharing options...
Helias_Tancred Posted November 14, 2021 Share Posted November 14, 2021 A very cool project! I love the real life game lore behind you running him too! spiros14 1 Back to top Link to comment Share on other sites More sharing options...
spiros14 Posted November 14, 2021 Author Share Posted November 14, 2021 For the 'snack jar' I suggest khorne red, wazdakka red (I think), followed by evil sunz scarlet, topped with warpstone glow technical paint. It makes for a wonderful glass look. That's usually what I use for my line troopers gemstones; which makes for a great ruby look. In this instance however I was concerned that it might blend in with the red of the tabard a little so I backed off from that. What I did use was Mechanicus Standard Grey Base shaded with abaddon black; then Dawnstone; Administratum Grey; and finally White Scar highlights. I also shaded the very edges of the glass with Aethermatic Blue just to add a little colour. A very cool project! I love the real life game lore behind you running him too! Thank you, Aphael is something of an infamous character in my gaming group, to the point where, when I removed him from my roster while running my current crusade campaign, his absence was very quickly noted. No doubt his return to the table will be heralded with cheers... moments before some monstrous enemy punches him in the face and leaves him sprawling to the floor I have gotten most of the torso assembly painted, leaving just the base for the assembly to go! I am quite proud of the blade of the blooded, which I feel has a nice glowing effect to it without going OTT. Once the base is finished, I will make a start on Aphael's cape, which I'll be painting a black colour to match the original model, with some gold NMM threads. I'm very thankful that I did keep the cloak seperate, as otherwise it would have been a right pain to cover! Until then! Majkhel and Helias_Tancred 2 Back to top Link to comment Share on other sites More sharing options...
spiros14 Posted November 17, 2021 Author Share Posted November 17, 2021 I am proud to say that Aphael is at last finished and ready to kill mankind's foes in the name of the Emperor! I feel that I've done the original piece justice with this build. I'll let you know what colours I've used, but first a quick comparison with GWs model and my own: For the cape I used a very basic scheme of Abaddon Black Base, followed by two highlights of Eshin Grey and Dawnstone, which are the same colours I used for the cloth on my bladeguard veterans units. The embroidery along the cloak was more complicated, with a Zandri Dust base, a Skeleton Horde glaze, followed by two shades of Snakebite Leather and Gore-Grunta Fur, and two successive highlights of Ushabti Bone and Screaming Skull. For the face I used the paint scheme shown in WHTV's Uriel Ventis video: Wraithbone base; Guilliman Flesh wash; and three highlights of Kislev Flesh; Flayed Flesh; and Pallid Wych Flesh. I also did the eyes and fangs; a rarity for me, but I definitely felt this model was worth it. I'd like to thank you all for following me on this project. I hope I have made for an entertaining and informative read. For the Emperor and Sanguinius! Xenith, Rhavien, Majkhel and 2 others 5 Back to top Link to comment Share on other sites More sharing options...

Recommended Posts
Create an account or sign in to comment
You need to be a member in order to leave a comment
Create an account
Sign up for a new account in our community. It's easy!
Register a new accountSign in
Already have an account? Sign in here.
Sign In Now