bigtrouble Posted February 20, 2022 Share Posted February 20, 2022 (edited) I just started working on my Dark Angels Legion Contemptor Dreadnought. I’d like to do a really nice base for it. This will be the first time I attempt a sculpted base, so I thought it would be nice to post process here, and get a little advice along the way. I wanted it to look like he’s walking through a rubble pile. Here’s some intital posing, working on ideas, the legs are only blue tacked together, the torso is pinned and not glued yet, so I still have full freedom to move. Any feedback is welcome! Edited February 21, 2022 by bigtrouble Link to comment https://bolterandchainsword.com/topic/373387-dark-angels-contemptor-project/ Share on other sites More sharing options...
bigtrouble Posted February 21, 2022 Author Share Posted February 21, 2022 Got the styrofoam chunks for the base glued down, using tacky glue PVA. Here are some shots with the legs for reference. The legs are just blue tacked for now. Dr_Ruminahui 1 Back to top Link to comment https://bolterandchainsword.com/topic/373387-dark-angels-contemptor-project/#findComment-5798381 Share on other sites More sharing options...
bigtrouble Posted February 21, 2022 Author Share Posted February 21, 2022 Showing some assembly here. The torso is pinned for solid assembly and so I can paint it in subassemblies. I might leave the pelvic joint unglued so I can take it apart for transport. I magnetized the weapon arms and a spot for the missile launcher on top. A little greenstuff filler here and in a few places with gaps or holes. Super easy fit on this model, and just a few cosmetic issues with the cast. Dr_Ruminahui 1 Back to top Link to comment https://bolterandchainsword.com/topic/373387-dark-angels-contemptor-project/#findComment-5798382 Share on other sites More sharing options...
PyroClast-91* Posted February 21, 2022 Share Posted February 21, 2022 lookin sick man i always love a good contemptor model not sure ive ever used open cell styrofoam for a base before you might run into some issues once you start painting it or hitting it with any adhesives as ive always found it to be very sensitive to anything with harsh chemicals in ti usually causing it to melt. On most of my scenic bases especially for my dreads i started out using piled up sprue bits and old rhino doors that type of thing but now i use either cork or tree bark both are usually pretty easy to come by very forgiving to work with and really easy to make look like stone they also add some weight to the base and will take paint glue and putty much much easier. Just my two cents hopefully it helps either way cant wait to see you get some paint on this beauty i bet its gonna be a fun one to paint with all those textures and awesome trim pieces. Silas7 1 Back to top Link to comment https://bolterandchainsword.com/topic/373387-dark-angels-contemptor-project/#findComment-5798413 Share on other sites More sharing options...
bigtrouble Posted February 21, 2022 Author Share Posted February 21, 2022 (edited) This will get several thin coats of plaster to seal it before priming. If this doesn’t work I’ll definitely go the cork route, but this is what I had lying around from other projects, so I’m giving it a try. Edited February 21, 2022 by bigtrouble Link to comment https://bolterandchainsword.com/topic/373387-dark-angels-contemptor-project/#findComment-5798439 Share on other sites More sharing options...
PyroClast-91* Posted February 21, 2022 Share Posted February 21, 2022 plaster should do the job nicely id imagine it makes for great rocks you can also ball up tin foil to coat in plaster and youve got some great boulders also not sure where abouts in portland your at but theres an awesome little shop out towards gresham i think its division and and 122- 136th area but its called whistle stop trains they have tons of great scenic stuff usually meant for trains as there name would imply but they work great for what we do too its also where i get all my plasticard and things if i dont order them online bigtrouble 1 Back to top Link to comment https://bolterandchainsword.com/topic/373387-dark-angels-contemptor-project/#findComment-5798663 Share on other sites More sharing options...
bigtrouble Posted February 21, 2022 Author Share Posted February 21, 2022 My wife and I got a bunch of woodland scenics stuff there for terrain! Love that place. Link to comment https://bolterandchainsword.com/topic/373387-dark-angels-contemptor-project/#findComment-5798693 Share on other sites More sharing options...
bigtrouble Posted February 22, 2022 Author Share Posted February 22, 2022 Progressing on the base. I added a few layers of plaster and some paper clip rebar. Glued in the pins for the feet: Underneath the base you can see the reinforcement of the pins: And filled in some gaps left by the glue. The obvious downside of working with styrofoam is that it is brittle and doesn’t hold up well to glue. I’m on a tight budget with this project however, so I’m making due with available scrap. I can already tell though that I’ll end up re-basing this model with cork at some point in the future. The nice thing about foam and plaster is I can really easily scrape it into the trash later on. Tyrannicide 1 Back to top Link to comment https://bolterandchainsword.com/topic/373387-dark-angels-contemptor-project/#findComment-5798818 Share on other sites More sharing options...
bigtrouble Posted February 22, 2022 Author Share Posted February 22, 2022 Wanted to get a good base coat on to seal everything in before I went any further. I use army painter, so this is 3 coats of brush on gray primer, and 3 coats of Field Grey, which has an olive tint to it, and will go nicely with the sand I use on my other bases. Link to comment https://bolterandchainsword.com/topic/373387-dark-angels-contemptor-project/#findComment-5799066 Share on other sites More sharing options...
bigtrouble Posted February 22, 2022 Author Share Posted February 22, 2022 Continuing with assembly, I fully drilled and pinned the hip joints first, so that I could hold them together while positioning the legs. The pin goes all the way through both ball joints. Link to comment https://bolterandchainsword.com/topic/373387-dark-angels-contemptor-project/#findComment-5799069 Share on other sites More sharing options...
bigtrouble Posted February 22, 2022 Author Share Posted February 22, 2022 Next I did some test fitting (not shown) and determined the front leg would be totally bent. I lined things up and used a dry erase pen to mark the orientation for pinning. All the joints in the lower half will be pinned. Dr_Ruminahui and Silas7 2 Back to top Link to comment https://bolterandchainsword.com/topic/373387-dark-angels-contemptor-project/#findComment-5799070 Share on other sites More sharing options...
bigtrouble Posted February 22, 2022 Author Share Posted February 22, 2022 Next I wanted to get the foot glued onto the shin in the right orientation, so I put the legs together and test fit the foot until the hip was mostly parallel to the base. It ended up being almost completely flexed to one side, which makes sense from the pose. Once I had the front foot solid, I put the hip joint in and got that aligned parallel. It was crucial to set the pelvis before doing the back leg so that I had something sturdy to work the back foot joint against. The back leg was nearly fully extended, but not totally straight, which looks unnatural. The back foot is the one with the flexed toe, and getting its alignment right took a couple tries. I again used dry erase marker to put reference marks on the leg to help align it. l wanted it to be slightly toe out. Lastly, I glued the hip on the back foot, trying to get the pin straight up and down as close to the center of the base as possible. Link to comment https://bolterandchainsword.com/topic/373387-dark-angels-contemptor-project/#findComment-5799076 Share on other sites More sharing options...
bigtrouble Posted February 23, 2022 Author Share Posted February 23, 2022 After getting the legs glued, it was time to work on posing the arms and shoulders. A lot of the character of this model is in the shoulder ball joints, so I was tempted to do some crazy posing with the weapon arms, like this first photo. In the end though, I settled for something more realistic as in the second photo, where the guns are actually pointed in the same direction! I haven’t glued the shoulders yet, just the part where the weapon arm connects to the shoulder pad. I still have some range if I decide to go wild after painting. While finalizing the knees, I realized I hadn’t test fit the back knee pad, so I had to do a little emergency trimming inside the knee and pad with superglue all over my knife. The near full extension of that leg doesn’t fit the part at all. Fortunately it didn’t leave a dramatic mess. Finally, everything is ready for priming. I’ll paint in subassemblies then glue it all together except the pelvis. The pelvis to abdomen joint is a little loose because the pin doesn’t fit the hole exactly, but I like being able to take it apart, so I’ll just hide some blue tack in there, or maybe put just a dab of glue on the pin to beef it up. I can’t decide whether to put the angel or the sword in the chest, so I’ll paint both, and maybe hide a tiny magnet there for giggles. Grotsmasha 1 Back to top Link to comment https://bolterandchainsword.com/topic/373387-dark-angels-contemptor-project/#findComment-5799122 Share on other sites More sharing options...
Pearson73 Posted February 23, 2022 Share Posted February 23, 2022 That base is looking nice, I also hadn't realised just how cool this sculpt was! bigtrouble 1 Back to top Link to comment https://bolterandchainsword.com/topic/373387-dark-angels-contemptor-project/#findComment-5799181 Share on other sites More sharing options...
bigtrouble Posted February 23, 2022 Author Share Posted February 23, 2022 So here are some process shots of the contemptor base. In order: 1. Dark wash all over, but focusing on shadows and crevices. 2. Made a stencil (well, more like a free-hand guide than a true stencil) of an imperial aquila so I could add some context and interest to the ruined wall3. Dry brushed on gray highlights, starting with Army painter Uniform gray and mixing up using Ash Grey to Spacehip Exterior. Each lighter color was more focused on the top edges. 4. Painted the rebar black, added some grey stripes to give it a textured look, and painted the cut ends with a Plate Mail metallic to simulate exposed metal. 5. Drybrushed Desert Yellow over the top to give it a sandy/dusty look. 6. Added some rust effects to the rebar to make it look older and weathered. Also painted the base in Dark Stone, which is my background color for sand on all my other bases, and touched up some light gray highlights on the flat surfaces. Silas7 1 Back to top Link to comment https://bolterandchainsword.com/topic/373387-dark-angels-contemptor-project/#findComment-5799366 Share on other sites More sharing options...
bigtrouble Posted February 23, 2022 Author Share Posted February 23, 2022 Finished with sand. I use just basic, natural construction sand that I've washed, baked, and sifted into 3 different sizes. I start with the fine sand, which I use on all my bases, then add a dusting of the medium, and finally just a sprinkling of the larger pieces to look like rocks. I worked some of the sand into the crevices. Sand is applied over diluted down white glue and then a very dilute white glue is put on top to help hold it. Dr_Ruminahui and Silas7 2 Back to top Link to comment https://bolterandchainsword.com/topic/373387-dark-angels-contemptor-project/#findComment-5799367 Share on other sites More sharing options...
bigtrouble Posted February 23, 2022 Author Share Posted February 23, 2022 Here it is with the model on top. Now I just have to wait for good priming weather, it's been sunny but cold and a bit windy this week. Hoping for slightly warmer on Friday to get these parts primed. Axineton and Dr_Ruminahui 2 Back to top Link to comment https://bolterandchainsword.com/topic/373387-dark-angels-contemptor-project/#findComment-5799368 Share on other sites More sharing options...
Axineton Posted February 23, 2022 Share Posted February 23, 2022 This is so cool! bigtrouble 1 Back to top Link to comment https://bolterandchainsword.com/topic/373387-dark-angels-contemptor-project/#findComment-5799374 Share on other sites More sharing options...
bigtrouble Posted February 23, 2022 Author Share Posted February 23, 2022 This is so cool! I’m glad it’s worth the time! It’s fun to do some more series like this with bigger projects. Axineton 1 Back to top Link to comment https://bolterandchainsword.com/topic/373387-dark-angels-contemptor-project/#findComment-5799383 Share on other sites More sharing options...
bigtrouble Posted February 24, 2022 Author Share Posted February 24, 2022 I got priming done. It wasn't ideal conditions here, a bit of a cold snap, but I got impatient... with mixed results. The black base coat went on fine, if possibly a little thick. I didn't lose any detail, but it's a bit glossy. I often see that slightly uneven first coat and keep going even when it's not necessary. I had to abort the full zenithal prime I had planned when my white can clogged after a couple sprays. Maybe it was because I didn't clean the nozzle last time I used it, maybe it was too cold, maybe it was just the last of the can and didn't mix up well. I don't know. It isn't terrible, I didn't lose any detail on this step either, it's not dusty, it's just not as easy to see the details as I'd like. The first couple coats of Skeleton Bone base coat are going on ok, so I'm not too worried. Painting bone white is such a hassle. Why did I chose Deathwing colors again? Majkhel and Grotsmasha 2 Back to top Link to comment https://bolterandchainsword.com/topic/373387-dark-angels-contemptor-project/#findComment-5799509 Share on other sites More sharing options...
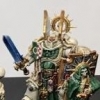
bigtrouble Posted February 25, 2022 Author Share Posted February 25, 2022 Primary color base coats are done, except the knee pad. I can’t decide on a color scheme for it, classic red and white? Green and gold? Something more unusual? Next step will be the metallics on the mechanical components, and probably then the chain before I do the metallic trim. I also can’t decide on the color for the metallic trim. I typically do Copper colors for standard deathwing, but I’m thinking I might do a mix of silver and gold to get a kind of muted yellow gold. Once I layer up the bone color, it will be fairly white, and I’m concerned the copper color will be too saturated. I’ll be doing a lot of mixing tests. Link to comment https://bolterandchainsword.com/topic/373387-dark-angels-contemptor-project/#findComment-5799853 Share on other sites More sharing options...
Pearson73 Posted February 25, 2022 Share Posted February 25, 2022 Off to a good start! Link to comment https://bolterandchainsword.com/topic/373387-dark-angels-contemptor-project/#findComment-5799864 Share on other sites More sharing options...
bigtrouble Posted February 26, 2022 Author Share Posted February 26, 2022 That part of a model's life where it just looks like a pile of garbage. Got the first part of the metallics done, all the gunmetal elements. Also did the dark wash on the metal and started on the soft wash on the bone armor. Next is the metal chain on the front, in a lighter metal color, and finish off the soft wash.I decided to do green for the knee pad. Still trying to decide if the Lion will be gold or white. Leaning gold. On the other pad, I'll do red on white with some freehand, maybe a sword, crossed keys, a simple chevron, or split field. Chaplain Raeven 1 Back to top Link to comment https://bolterandchainsword.com/topic/373387-dark-angels-contemptor-project/#findComment-5800059 Share on other sites More sharing options...
bigtrouble Posted March 1, 2022 Author Share Posted March 1, 2022 Still just a pile of parts, but I’ve finished the base coat and primary washes on the weapons and torso now. There’s a long way to go on layering and glazing the bone white. I have some ideas for fancying up some of the details. I’m going to paint black and yellow hazard stripes on the battery boxes for the lascannons, and I’ll do the power cables in a mix of colors. I still need to decide on colors for the angel or sword motif on the chest, pick a color for the candles (purple maybe?), and I think I’ll be re-painting the shoulder pad chapter Icon with white feathers on the wings, might look good against the red sword, and a bit more of a classic look. Link to comment https://bolterandchainsword.com/topic/373387-dark-angels-contemptor-project/#findComment-5800788 Share on other sites More sharing options...
bigtrouble Posted March 5, 2022 Author Share Posted March 5, 2022 So here’s the progress shots of layering up the bone color, each layer with more spaceship exterior (very light gray) added. It’s hard with this color pallet to allow the shading to show, so I ended up going back and doing the recess shading again. I may still go in and clean up that shading again after all the other work is done, as I’m not sure it completely achieved the look I want, especially around the rivets. Dr_Ruminahui 1 Back to top Link to comment https://bolterandchainsword.com/topic/373387-dark-angels-contemptor-project/#findComment-5802077 Share on other sites More sharing options...
Recommended Posts
Create an account or sign in to comment
You need to be a member in order to leave a comment
Create an account
Sign up for a new account in our community. It's easy!
Register a new accountSign in
Already have an account? Sign in here.
Sign In Now