spiros14 Posted April 25, 2022 Share Posted April 25, 2022 Greetings, followers of the Warmaster! My friend has recently taken a shine to the Black Legion, having been inspired by both the books and the prospect of a new codex. However, he isn’t an avid painter, often needing a lot of encouragement or event to push him to paint his army. I wanted to help him with a simple scheme and at the same time take the opportunity to engage in a painting exercise I’ve been considering for a while now: How quickly can you paint a battle-ready chaos space marine? And what can you do to turn that battle ready into a parade ready standard? I set about writing up a paint scheme with three different tiers of quality, starting with the Battle-Ready painting video made by Warhammer TV during the Vigilus Ablaze release, with a couple of modifications to reflect the new contrast paints, and to include the basing of the model. I will be using a Blackstone Fortress model I have had for a while now but never bothered to paint – now is as good a time as any. I plan on timing myself for each tier for the model and documenting the result. I hope that this thread will act as a guide for aspiring warlords, and perhaps inspire some players to take it on themselves. (which, if you do, I'd love to hear how it pans out with larger units) Guzzlrr, infyrana, Dr_Ruminahui and 2 others 5 Back to top Link to comment Share on other sites More sharing options...
spiros14 Posted April 25, 2022 Author Share Posted April 25, 2022 (edited) I had my model spray painted black previously and started my timer. The first step was to paint in the trim with retributor armour and add a texture paint. In this case, I used Stirland Mud as it was close to hand but any texture should do. After three coats of retributor armour, applied with an old small layer brush, I finished this stage at the twenty-three-minute mark. I next moved onto the other metallic areas and horns. As both areas don’t touch, I was able to paint them at the same time without fear of contamination. Again, these were applied with a small layer brush in a slapdash fashion, though I was careful to not cover the areas I already touched, mainly through watering the paint to a thin enough consistency that it just flows into the joint areas I;, painting. I finished this stage at the thirty-nine minute mark. My last two basecoats would be mephiston red for cloth areas and the eyes; and mournfang brown for the leather areas. These two areas are close together on the model, so I had to wait for one to dry before moving onto the next. I had to pull out an older xs artificer brush for this step to fill in the eyes and small leather straps near the buckle, but for the most part all I needed was the old small layer brush. I finished the red at the fifty minute mark, and the brown at the one hour mark. Following this was the washes. I used a basilicanum grey and contrast medium mix over the model (I finder much more manageable over large areas than nuln oil). I was also able to apply Agrax Earthshade over the texture paint at this time (as neither was in any danger of contaminating each other), and this put me at the one hour twenty-six minute mark. I was then able to put on the reikland fleshade wash over the gold trim areas, which pushed me at one hour thirty-one minutes. It was here that I broke for lunch to let the shade dry. After an hour, I filled in the black panels with an xs artificer brush, which took twenty minutes to complete. Overall I’m happy with how this model has come out so far, and am pleased that it was completed in such quick a time. I’ll be moving onto my next tier, which is made up of more detailed WH painting videos I’ve found over the years. I will continue to time myself here, and we’ll see what results I get. Edited April 25, 2022 by spiros14 Dr_Ruminahui, Grotsmasha, TrawlingCleaner and 2 others 5 Back to top Link to comment Share on other sites More sharing options...
infyrana Posted April 25, 2022 Share Posted April 25, 2022 (edited) Great stuff, I applaud your efforts to help out a friend! *edit ignore me :) Edited April 25, 2022 by infyrana Link to comment Share on other sites More sharing options...
spiros14 Posted May 1, 2022 Author Share Posted May 1, 2022 Apologies for the long wait time. I did manage to get all three tiers of my model painted in one day, I just need to get around to typing my findings up! So, as I said previously, this second tier takes a lot of tips and techniques found scattered across painting videos over the years, and I won’t reference them here right now, unless asked. One of the big inspirations around this experiment is a personal experience surrounding tournaments and events at Warhammer World, who (rightly, I feel) employ a “your model must be painted” policy for their event games. It’s often the case where one of my group attending these events will rush a model to get it ready for the tournament, with the excuse of “I’ll fix it in post,” only to never do so. With this thought process in mind, that we’re adding more detail to the model after a tournament or event, how long it takes to paint the next two tiers to me are less important. I’ve included the times anyway, however, just in case anyone wanted to know. (I also raise the challenge to anyone to paint a unit of these to these tiers and report back on times, just to get an idea on the difference between single model times and full unit times) I started with a heavily watered down rhinox hide on the armour recesses, This is a technique I’ve only just begun to use on dark armoured models to use as shading, and in the case of this model, I’ve been sure to only really use it on recesses where black meets black, such as around the feet, elbows, and the backpack. I’ve also put in in the recesses of the chaos star on the model’s right shoulder pad, and in any battle damage that might have been on the model. This was all painted with a small layer brush, and only took six minutes to complete. I next edge highlighted the armour with Dark Reaper with an xs brush. This is one of the more time consuming parts of painting black legion to the style of the box art, but I feel it really makes the model. I not only highlighted the edges of the armour plates, but I also drew small lines near where the black armour and gold trim meet, to mimic the box artwork. This put me up to twenty-one minutes. I next added two contrast paints on areas of the model. I started with black templar over the weapons casing, with the plan of having a weapon casing that is black but can still be picked out from the black armour of the model; and I added snakebite leather over the bolter rounds inside the weapon magazine, to give me a very easy bronze colour. Both of these paints put me at twenty-four minutes. My original plan was to go onto the gold trim, but I still had to wait for the weapon casing to dry, so instead I moved onto applying mephiston red as a midtone on the loincloth, picking all but the recess areas, and tidying up what the basilicanum grey contrast wash in my battle ready plan had done with a small layer brush. This required two thin coats, and put me at twenty-seven minutes. I could then move onto highlighting the gold trim with liberator gold with an xs brush. I tend to get a very thin highlights with liberator gold, and it isn’t always visible, but I did try to line every edge of gold with it, and that put me at the thirty-eight minutes mark. I then went to highlight the red areas (both the loincloth and the eyes) with evil suns scarlet with an xs brush. This I felt helped put a lot of colour on the model and really helped it pop out. This took me to forty-two minutes. Skrag brown was then applied as a highlight layer on the leather belt and holster. This took me to forty-five minutes A midtone of rakarth flesh was applied to the horn and bone areas. I tend to ignore the heavily textured areas of the horns in favour of the smoother areas. I also find it important to pick out all the little fangs embedded in the gold trim, to help it stand out against the black armour. This took me to forty-nine minutes. Finally, I drybrushed the base with Karak stone. I tend to use this colour regardless of what texture paint I used to begin with, as I find Karak stone to be the perfect neutral dusty colour that goes with just about anything on a base. With that my second tier is completed and ready for more serious battle. When I showed this to my friend I got quite a positive reaction to it, and it’s my hope that he uses this scheme for his future army. As said previously, I fully painted this model up on the day, so I’m just in progress of typing up my final tier now. See you then! Lord Abaia and Dr_Ruminahui 2 Back to top Link to comment Share on other sites More sharing options...
Tallarn Commander Posted May 1, 2022 Share Posted May 1, 2022 An interesting experiment and an excellent-looking model. Link to comment Share on other sites More sharing options...
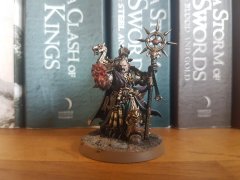
spiros14 Posted May 1, 2022 Author Share Posted May 1, 2022 Thank you. I’d like to think that this painting style might be good for the tournament goer, the player who buys an army in one hit for an event and needs to get it all done quite quickly, as opposed to the player who builds their army one or two units at a time. While I’m definitely more the latter than the former, the concept of “fixing a model in post” appeals to me, and I think after seeing the results of this legionnaire, I may continue this with the other legions in WHTV’s speed painting/battle ready series, notably the Emperor’s Children and the Alpha Legion. Anyway, while I feel the middle tier is a decent model that wouldn’t shame any tabletop or garner any scorn from an opponent, I wanted to add a bit more to it. This isn’t ‘Eavy Metal standard by any means, but this tier is the level of detail I employ on most of my models, and would be perfect for units you want to stand out, such as terminators, chosen, characters, or perhaps the big man Abaddon himself. Again, time isn’t a concern for this tier, but for completion, I’ve included it anyway. As this is more or less all one coat highlights with an xs artificer brush, this tier only took me a little under half an hour. I start off with the biggest piece of the model – the armour. I start with a highlight of Russ Grey, painted only on the edges of black armour panels like the torso, backpack, arms and feet, and not the lines where black armour meets gold trim, like with the previous dark reaper. I then did dot highlights of Fenrisian grey on the very corners of the russ grey highlights, and on armour rivets like those on the backpack. These steps took six and three minutes respectively, putting me at nine minutes total. Next I highlighted the weapon casing with leadbelcher, to help differentiate between the shiny black armour and more weathered weapon. I also had a bit of fun scrawling some chips and a tally mark on there. This put me at twelve minutes total. The next few metallic layers are a little hard to see (again, my metallic layers are usually quite thin) but I applied Sycorax Bronze to the bullets in the magazine; Stormhost silver as an edge highlight on the silver details like the boltgun mechanics and suit piping; and Stormhost silver as dot highlights on the gold trim. This in total put me at the eighteen minute mark. I next worked on the red areas of the model, adding a Fire Dragon Bright layer to the cloth and eyes, and a reflective white scar dot to the back of the eyes (it is crazy how much more life that white dot can give to an eye lens) This put me at twenty-two minutes total. Karak stone was used as a dot highlight on the leather to simulate wear on the corners and just dotted here and there along the belt, which put me at twenty-four minutes. (I cannot emphasis enough how much I love to use karak stone as a wearing colour, as I tend to use it not only on leather, but also on some cloth and occasionally drybrushed on armour plate – it’s just so universally bland and neutral) The last two layers were on the horns and teeth, which were highlighted with pallid wych flesh and white scar, which put me at twenty-six minutes. I then gave a light drybrush of the base with Terminatus stone to give a tad more volume, and I can call this miniature fully painted! It is at this point I would probably start adding some grass flock to the base and add transfers to areas like the shoulder pad and legs, to give a bit more colour and life to the model, but I’d say that how much you add to that is dependent on the artist, so I’m happy to leave that topic alone. I am proud of how this legionnaire has turned out, and again it received a positive review from my friend, which makes this an all-round win. I hope that this guide has been helpful to any black legion players looking for a new paint scheme ready for the upcoming codex, and again, I’d love to hear how about your own experiences using it are. Let the Galaxy Burn! Dr_Ruminahui and Tallarn Commander 2 Back to top Link to comment Share on other sites More sharing options...
Closet Skeleton Posted May 1, 2022 Share Posted May 1, 2022 (edited) Battle ready Black Legion in 4 steps. Silver/steel metalic undercoat. Black Templar contrast over armour panels and any pouches. Mephiston red on eyes and cloth. Brown ink over entire model. Might be better with the black templar step moved to last. Edited May 1, 2022 by Closet Skeleton Link to comment Share on other sites More sharing options...
spiros14 Posted May 1, 2022 Author Share Posted May 1, 2022 Battle ready Black Legion in 4 steps. Silver/steel metalic undercoat. Black Templar contrast over armour panels and any pouches. Mephiston red on eyes and cloth. Brown ink over entire model. Might be better with the black templar step moved to last. I won't deny that isn't fast, and that if you wanted an army finished yesterday, that would probably be the one to go for. At the same time, I think that would also be quite tricky to fix in post, especially when you consider turning the silver trim gold (a Nazdreg yellow contrast wash maybe?). It may also be more difficult to emulate on larger models like vehicles. I'll be sure to let my friend know of your speed-painting strategy. I'd love to hear what sort of time and the finished result of such a model, so please feel free to post an example if you have one. Link to comment Share on other sites More sharing options...
MegaVolt87 Posted May 2, 2022 Share Posted May 2, 2022 In future, try to be as neat as possible painting the trim. Going back to correct that gold would have added on a lot of time to the process. Still, interested in seeing the final result. Link to comment Share on other sites More sharing options...
spiros14 Posted May 2, 2022 Author Share Posted May 2, 2022 You are quite correct, it took up twenty minutes to refill the black panels, though that was an intended step anyway. Again, I would love to hear your own times using this scheme. I am also afraid that my fourth post in this topic is my final result, and I have no plans on adding any more to it. If you would like, I can try and get some more pictures of it taken at different angles so you can get a better view of the model. Prot 1 Back to top Link to comment Share on other sites More sharing options...
Prot Posted May 3, 2022 Share Posted May 3, 2022 I always applaud a fully painted army. After some time ( many years) I personally went from trying to do every piece as good as I could, to finding a compromise to actually complete entire armies. I think you finished marine is great. There are a lot of good ways to get a decent result. I don’t think there’s a wrong answer. I personally love what you’ve done there with a reasonable time limit and would be a fantastic level of quality over a 2K army. spiros14 1 Back to top Link to comment Share on other sites More sharing options...

Recommended Posts
Create an account or sign in to comment
You need to be a member in order to leave a comment
Create an account
Sign up for a new account in our community. It's easy!
Register a new accountSign in
Already have an account? Sign in here.
Sign In Now