our_baz
-
Posts
1685 -
Joined
-
Last visited


our_baz's Achievements
")


-
 Lathe Biosas reacted to a gallery image:
IMG_20230809_105334.jpg
Lathe Biosas reacted to a gallery image:
IMG_20230809_105334.jpg
-
 our_baz reacted to a post in a topic:
Adeptus Custodes Officially Include Women
our_baz reacted to a post in a topic:
Adeptus Custodes Officially Include Women
-
 our_baz reacted to a post in a topic:
Atia's Thread (Road to Champions of Slaanesh - Noise Marine Paint Tester pg. 108)
our_baz reacted to a post in a topic:
Atia's Thread (Road to Champions of Slaanesh - Noise Marine Paint Tester pg. 108)
-
our_baz reacted to a post in a topic:
Atia's Thread (Road to Champions of Slaanesh - Noise Marine Paint Tester pg. 108)
-
our_baz reacted to a post in a topic:
Atia's Thread (Road to Champions of Slaanesh - Noise Marine Paint Tester pg. 108)
-
our_baz reacted to a post in a topic:
Doghouse's WIPs
-
our_baz reacted to a post in a topic:
Doghouse's WIPs
-
 our_baz reacted to a post in a topic:
Two Thin Coats Wave 2 - testing the new Glazes and Metallics
our_baz reacted to a post in a topic:
Two Thin Coats Wave 2 - testing the new Glazes and Metallics
-
our_baz reacted to a post in a topic:
CSM Rumours
-
our_baz reacted to a post in a topic:
Army painter question, dirt spatter
-

Army painter question, dirt spatter
our_baz replied to Inquisitor_Lensoven's topic in + GENERAL PCA QUESTIONS +
@Firedrake Cordova is correct. I use Army Painter paints on occasion , some of them need a real good shake otherwise they come out excessively watery. -
Dr_Ruminahui reacted to a post in a topic:
=] Call to Arms: Imperium Stronghold [=
-
SvenIronhand reacted to a post in a topic:
=] Call to Arms: Imperium Stronghold [=
-
Jolemai reacted to a post in a topic:
=] Call to Arms: Imperium Stronghold [=
-
Thanks @duz_. WN series 7 their kolinsky sable, am I right? I’ve not trusted myself with kolinsky sable brushes for general work horse duty, I I’m worried I’ll destroy them after one use, even with cleaning and preservation. I’m currently using Rosemary and Co “Red Dot” for my general work, and their Kolinsky brushes for detail work. I’ll look at the WN series 7 and see what price difference is.
-
GreenScorpion reacted to a post in a topic:
E Company of the 7th Levalloisian Life guards WIP
-
Brother Carpenter reacted to a post in a topic:
=] Call to Arms: Imperium Stronghold [=
-
librisrouge reacted to a post in a topic:
E Company of the 7th Levalloisian Life guards WIP
-
duz_ reacted to a post in a topic:
E Company of the 7th Levalloisian Life guards WIP
-
Harrowmaster reacted to a post in a topic:
E Company of the 7th Levalloisian Life guards WIP
-
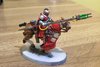
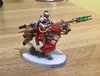
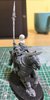
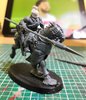
File this under couldn't wait to paint it.....but absolutely hated the process. First issue the model is busy and cramped in places, it really should have been painted in sub-assembly's, second tried to use contrast paints mostly, but a combination of poor control and sub-optimal finish (on the red) I spent waaaay too much time touching up before applying the next paint. Anyway first in the bag 4 more to go. Using the first Rough Rider as a learning opportunity, I've changed by painting technique on the second. Still using contrast/contrast like paints on the main horse body and cloak as its easier to get at and I'm slopping it on quickly and then mopping up with a dry brush to ensure good coverage and not worry about getting paint on the wrong surfaces. For the rider which is more fiddly and a tighter space to work in I've reverted to a classic layering style. So far its been a much more pleasing process.
-
Imperial Guard Army
Images added to a gallery album owned by our_baz in Astra Militarum / Imperialis Auxilia
-
-
GreenScorpion reacted to a post in a topic:
E Company of the 7th Levalloisian Life guards WIP
-
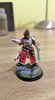
Rule of cool sword....that way could proxy as a castellan/company commander
- 760 replies
-
- 1
-
-
- battle report
- wip
- (and 3 more)
-
I can see why you went with contrast paints, a lot of the texture on those models screams out for their use. The layering method looks way better though, now you have done it. I've avoided using GW contrast paints on larger flatter areas. The pooling I find a real issue (having similar poor results on my Rough Riders). I've switch to Vallejo Xpress colour for flatter areas (the horse hind quarters), as the longer drying time allows you to mop up any pooling and get a smoother finish.
- 760 replies
-
- 1
-
-
- battle report
- wip
- (and 3 more)
-
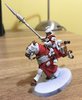
Been working on a Pledge for "Call To Arms. My slightly converted Castellan has been completed. This again has been done mostly with contrast paints over a gentle zenthial base coat. With that done I've began to horse around (I'll get my coat) with my second part of the pledge. The Rough Riders are also mostly being painted with contrast type paints over a gentle zenthial base coat.
-
=] Call to Arms: Imperium Stronghold [=
our_baz replied to Grotsmasha's topic in + ARTISANS' WORKSHOP +
Update on pledge Castellan is done....onto the Rough Riders -
=] Call to Arms: Imperium Stronghold [=
our_baz replied to Grotsmasha's topic in + ARTISANS' WORKSHOP +
"I, our_baz, heed the Call to Arms and pledge to paint 1 x Castellan a 1 x Rough Riders squad for {6 pts} for the Glory of The Astra Militarum and the Imperium Stronghold on or before 30th September 2023, or bear the badge of failure until years end." -
Deathwatch Index
our_baz replied to TrawlingCleaner's topic in + ADEPTUS ASTARTES / LOYALIST LEGIONES ASTARTES +
So it is thank you. -
Deathwatch Index
our_baz replied to TrawlingCleaner's topic in + ADEPTUS ASTARTES / LOYALIST LEGIONES ASTARTES +
Would I be right in also reading that any of the leader options that you might want to include in a DW army from the marine index (e.g. Cpt, Apothecary, libby etc) cannot become attached to any of the bespoke DW units (e.g. Vet Kill Team, Fortis / Proteus Jill Teams) as they don't have the correct key words under "Leader" in the data sheets in the SM Index? Need to get my eyes tested, disregard -
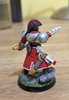
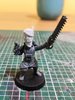
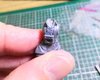
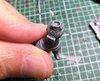
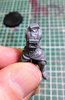
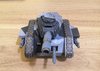
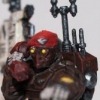
For your consideration. I really should be painting, but lacking the motivation with my current project. So time to kit bash some Guard. As promised in another thread (@Brother Captain Vakarian), below is a series of pictures illustrating how I converted (butchered) the Kreig torso's so 3rd part head can fit them. First image is showing a 3mm hole ~2mm deep in the neck area. after this it a case of cutting out the v in the neck (second pic). The shaving and filing the newly created neck recess and the ball joint on the new head carefully until a snug fit is obtained. Slightly easier kit bash next, simple head swap on another rough rider I also saw this head with a bicorne hat, I loved it and had to use it on something so I picked up the new castelan model and there you go. The proportions looked a bit off to me initially after I assembled it, but also was a bit of a pain to fit as the collar area on the torso and the neck of the model needed a bit of shaving to ensure any sort of fit could be achieved.
-
FYI ball joint on the head required a little filing (not much). Next time I'm converting ill show the WIP in my thread as a reference. @Brother Captain Vakarian you are welcome.
-
Conversion bits for new Guard
our_baz replied to DranuTemplar's topic in + ASTRA MILITARUM / IMPERIALIS AUXILIA+
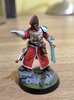
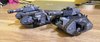
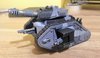
To give your an idea of size here are 2 Anvil heads on the new castellan and rough riders. The proportions look fine to me.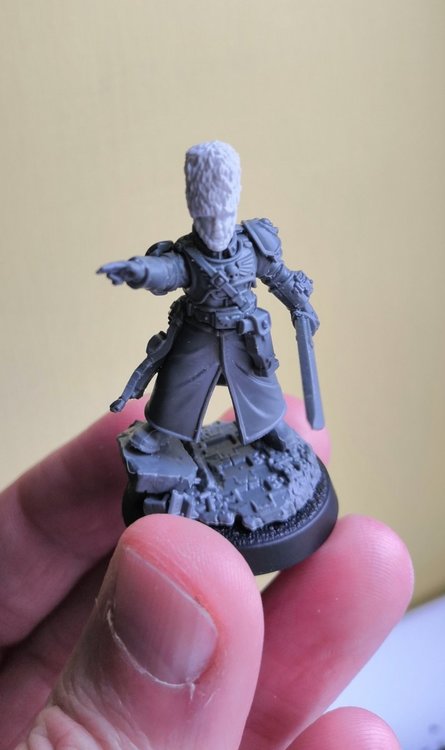
-
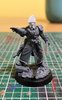
I second this, it takes a bit of work. Drill a 3mm hole and a bit of extra filing and cutting and sorted. Example with bearskin heads.