bloodhound23
-
Posts
426 -
Joined
-
Last visited
1 Follower

About bloodhound23

Recent Profile Visitors
665 profile views


bloodhound23's Achievements
")


-
 Rusted Boltgun reacted to a post in a topic:
Violent Gods: 3rd return to the hobby's the charm? (Updated 11/22/2025)
Rusted Boltgun reacted to a post in a topic:
Violent Gods: 3rd return to the hobby's the charm? (Updated 11/22/2025)
-
 bloodhound23 reacted to a post in a topic:
Grotmas Calendar 2025
bloodhound23 reacted to a post in a topic:
Grotmas Calendar 2025
-
 Tallarn Commander reacted to a post in a topic:
Violent Gods: 3rd return to the hobby's the charm? (Updated 11/22/2025)
Tallarn Commander reacted to a post in a topic:
Violent Gods: 3rd return to the hobby's the charm? (Updated 11/22/2025)
-
Tallarn Commander reacted to a post in a topic:
Violent Gods: 3rd return to the hobby's the charm? (Updated 11/22/2025)
-
Grotsmasha reacted to a post in a topic:
Violent Gods: 3rd return to the hobby's the charm? (Updated 11/22/2025)
-
Grotsmasha reacted to a post in a topic:
Violent Gods: 3rd return to the hobby's the charm? (Updated 11/22/2025)
-
Firedrake Cordova reacted to a post in a topic:
Violent Gods: 3rd return to the hobby's the charm? (Updated 11/22/2025)
-
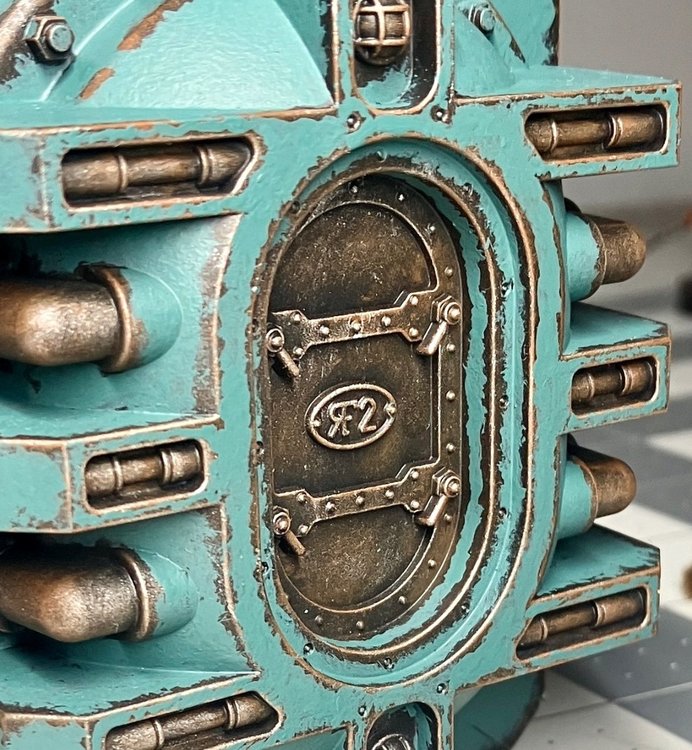
 Some updates: went through with some more rust patches, starting with a larger patch of Typhus Corrosion, AP Dark Rust, and then the very middle with AP Fresh Rust. It's been done inconsistently—and done too much in a number of places—but I intend to work up all the main patches as well as knock the other ones back to brown/Typhus Corrosion if needed when overdone. The banding has a little bit of integration but still needs some work. The color patches I'm mostly happy with as is.
 -
 bloodhound23 reacted to a post in a topic:
Violent Gods: 3rd return to the hobby's the charm? (Updated 11/22/2025)
bloodhound23 reacted to a post in a topic:
Violent Gods: 3rd return to the hobby's the charm? (Updated 11/22/2025)
-
Valkia the Bloody reacted to a post in a topic:
Violent Gods: 3rd return to the hobby's the charm? (Updated 11/22/2025)
-
Firedrake Cordova reacted to a post in a topic:
Violent Gods: 3rd return to the hobby's the charm? (Updated 11/22/2025)
-
So I was pretty bummed when I threw on these two colors before I had done any subsequent weathering. It looked like a tube of toothpaste and I felt like I had ruined it. What in my mind was supposed to be a water tower color scheme looked really off. I have photos of that stage, but I'll just let you take my word for it that it was bad. But I persisted, and even though the banding and the rest of the "metal" banding and piping needs to get some rusting, I have done a little bit and it's starting to take shape. The blue/green and white areas got stippled in and then received a light black wash, a light brown wash, and then some stippled in Typhus corrosion and some streaking with Ratling Grime and Vermin Brown to help feather out the chipped areas. I also got the Army Painter rust paints, so I'll try those out as well. Going to add some stenciled numbers on the upper green sections on the big can, and probably will paint the outer 5mm of the raised parts of the platforms with some sponged yellow, probably won't do proper hazards stripes, more like a street curb effect. Crank handles will probably get some red, and I'll need to do the dataslate/water meter and the pressure gauges on the top parts of both tanks as well. My biggest concerns are how to weather the base (not well pictured here)—as the space between the granny grating is still mostly black—and if adding the yellow and red will make the piece too busy. For the grating on the base, I'd like it go look like dusty, rusty metal, so maybe pigments or just rust wash. But without going in to paint every little square of recessed space, I'm not sure there's a good quick way to do it. Interested in tips on these two issues if anyone has any advice. I kinda hate this part where I have to make the detail decisions, I get easily overwhelmed and things tend to slow down.
-
bloodhound23 reacted to a post in a topic:
New Chaos Models
-
Magos Takatus reacted to a post in a topic:
Christmas Day Made-To-Order Terrain
-
Frogian reacted to a post in a topic:
Christmas Day Made-To-Order Terrain
-
Christmas Day Made-To-Order Terrain
bloodhound23 replied to Lord Marshal's topic in + NEWS, RUMORS, AND BOARD ANNOUNCEMENTS +
This one is weird to me because these kits are so popular in so many different games within the GW ecosystem that I genuinely didn't know they were out of OOP. No one asked me, but if I were James I'd treat these like the Tac Squad box and run it until people stop buying it (which will be never). Bummed to know prices will now be inflated over this. -
bloodhound23 reacted to a post in a topic:
Jokaero Challenge 2025
-
bloodhound23 reacted to a post in a topic:
Christmas Day Made-To-Order Terrain
-
bloodhound23 reacted to a post in a topic:
=][= AUSTRALIAN SOCIAL MEDIA AGE RESTRICTIONS =][=
-
bloodhound23 reacted to a post in a topic:
=][= AUSTRALIAN SOCIAL MEDIA AGE RESTRICTIONS =][=
-
bloodhound23 reacted to a post in a topic:
Valkia's Universe of Darkness (Chaos, Inquisition, Necrons, Kill Team and Tyranids)
-
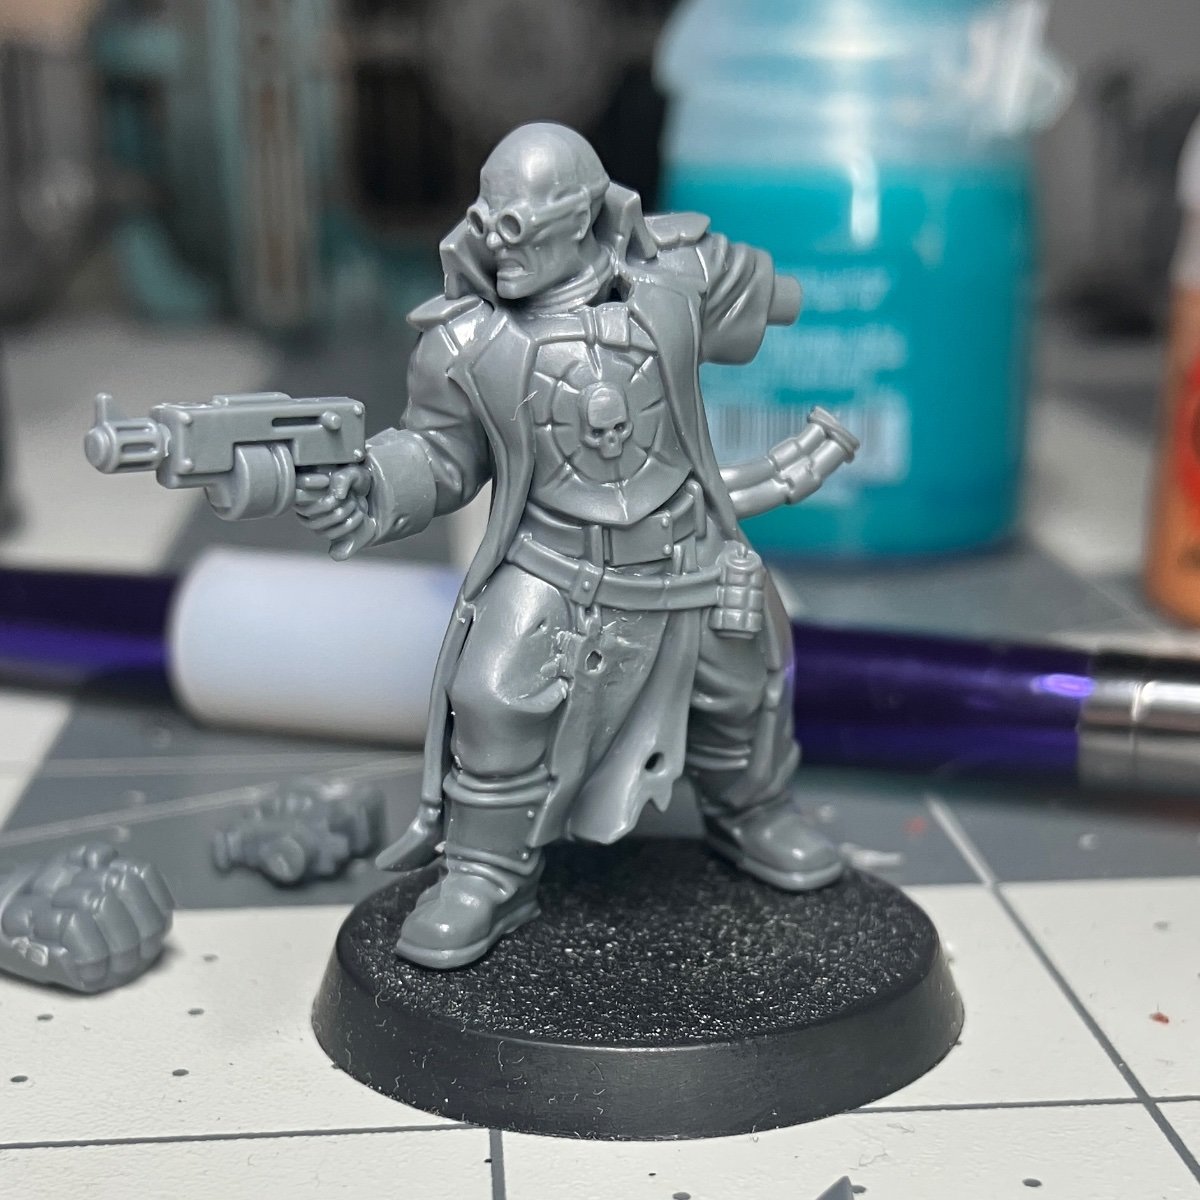
Had a busy break! Can say that if you've never cut a ball and socket style head down to fit a Krieg neck, it's certainly a labor that only those who do it for the love of the game can tolerate. Here's another one, and I'll need to fill in the neck and the straps before I glue on the other arm. I can promise, however, that the other arm is better than this one! Clever trick for a wrist-mounted monorapier blade, stay tuned. Tentatively titled "The Extractionist." Count-as Interrogator. I figure the tools count as the book, and he prefers las weapons, as they are less messy and give him a better chance of getting information when there's less stabilizing to do after the neutralizing. The real truth is that I scoped out a couple of autopistol swapping options, but I just think it's too risky that it won't look as good as the one that came with the model.
-
 bloodhound23 reacted to a post in a topic:
Violent Gods: 3rd return to the hobby's the charm? (Updated 11/22/2025)
bloodhound23 reacted to a post in a topic:
Violent Gods: 3rd return to the hobby's the charm? (Updated 11/22/2025)
-
bloodhound23 reacted to a post in a topic:
Violent Gods: 3rd return to the hobby's the charm? (Updated 11/22/2025)
-
Got a lot done, basically spent all day doing this, but it's now about 90% done. Of course things got a little crooked when I glued everything down finally, not my best moves there, but I'll live with it. I am tempted to slice off the far left join on the middle walkway to get it more straight, or I could let it be a "happy little accident." Just detail colors, weathering and what not left. Might go with Sons of Horus Green to tie it in to the plasma generator, which is basically only one step further along than this piece now. Looking for advice, the plan is to go from here to "reverse weathering" (great name) by blocking in a color in between the banding, as well as traditional washing, sponging and streaking after. I might try some hazard stripes and some stenciled numbers or something on the side, too.
-
Inquisitor warbands - p4: the forests
bloodhound23 replied to gideon stargreave's topic in + WORKS IN PROGRESS +
It’s great seeing your work elsewhere on the web, too! -
I lied! Here's a count-as-Pistolier. Will likely go with my most recent Inquisitor kitbashes. I'll need to rebuild the backpack where I made room for the pistol to sit, but this one is mostly done as well. Lest I build too many big brains, I might need a way to distinguish this one's head more from its source.
-
Bouncing around between a couple of things right now to stay motivated: Left arm graft turned out pretty good actually. It will still need a bit of sculpting, but I think I captured where the elbow/hand should be and they look fairly proportional. I hacked the bit from the Blooded power sword arm just above the elbow and then clipped away the little pushfit part for the original model's power fist, and then carefully scraped both sides with constant re-checking before it looked natural + the right length. Both hands are from the regular part of the Blooded kit, so they'll scale well together. Can't decided if I'll extend the trenchcoat sleeve down to the hand or leave it asymmetrical. I'll need to get the GS out to fill in the coat still anyway. Scraping away the power cables that go from the back to what would've been a powerfist went okay, I probably should have swapped out for a newer blade on my hobby knife, but I'm thinking it's a good place for some accessories anyway. So that's what's left. Off screen, I have primed my scratch built Water Rationing station, so that's what's up next, in addition to finishing these two marines, the Plasma Generatorium, and building out some more INQ28 singles. Here's the inspiration:
-
"Maybe this whole different new unit will be easier to build, prime, and paint than the half-done unit I already have" Why are we like this?
-
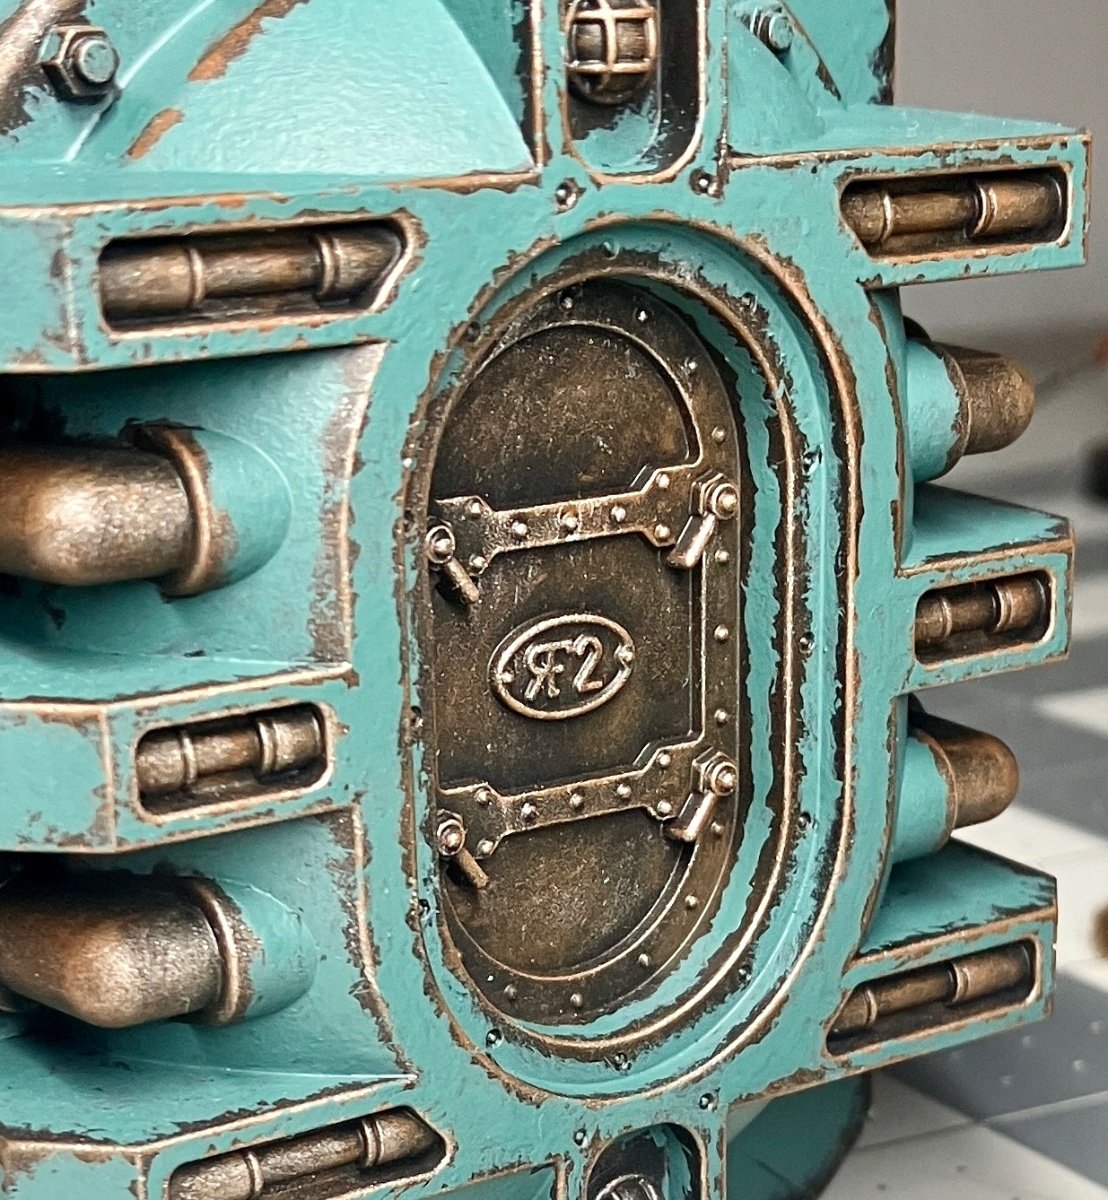
I really like the 3D effect you get from painting the unthinned green onto the middle portions of the generator’s housing and leaving the edges that would be subject to wear and tear. Again want to credit this to Sonic Sledgehammer on YouTube. The actual edge created by leaving the drybrushed layer underneath the green will hopefully be picked up in the washing stages, as well.
-
Tell me the saga of 3rd/3.5 edition
bloodhound23 replied to Uprising's topic in + WARHAMMER 40,000 GAME +
Yep. 1000 point games would be if you had a newer army or something you wanted to try out before committing to buying/painting more. -
I just tried some on the autosavant, and now I am, too. The real question is: do I risk going to the hobby store for "just masking tape"? I never just get one thing.
-
Tentatively done with the Sonic Sledgehammer version of this piece: Chaos Black, drybrush Mournfang, drybrush Necron Compound, roughly paint in color of choice (SoH Green here). Next task is probably weathering, although I do need to decide on accent colors, because once I paint over that original recipe that shows through, I won't be able to get it back. Tentatively I'm thinking leave the banding as is, do the the top/bottom ID plate and Cog ID plate on both sides + the pipes in a brass color (Runelord up to Sycorax maybe), and do the pistons/vents/stairs/railings in Iron Hands Steel plus a ton of Ratling Grime/Nuln Oil. I think the fanes themselves for the generator I will do in Balthasar Gold instead of a light blue color, so they'll look inactive. This leaves the doors themselves. ID plates and handles will likely be in the same brass color, and the banding I'll leave in the rusty drybrushed base coat. I'm leaning towards some sort of red or hazard stripes. What do we think?