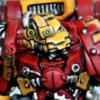
Lamenter Posted February 9, 2010 Share Posted February 9, 2010 This is my guide to how I make an Actual Scale Space Marine (in mark 7 power armour) and is also posted on my blog, but I think it'll be more visible and hence more useful here. This guide shows my approach, and has been strongly influenced by Doghouse and Synpase amongst others. There are of course other tutorials and probably better approaches, feel free to improve on mine and post your own tutorials. http://www.masteroftheforge.com/files/images/actualscaletutorial/83.jpg Components You Will Need These components are everything you will need for a basic Tactical Space Marine carrying a bolter with both hands. Bases- this choice will depend on how you plan to use these conversions in game. Will they "count as" Terminators or Power Armoured marines? Are you planning on using them in tournaments? There are a number of things to consider. A power armoured space marine normally mounts on a 25mm base. Using Terminator legs are a little too big and look uncomfortable on the 25mm. Personally I find 40mm looks too big. 30mm is a decent compromise, that is not too much of a difference for casual games. Aesthetically 30mm is the nicest size for the Terminator legs. One option I've been considering is magnetizing the model's feet, and having a choice of bases (hell, you could even have different style bases for different gaming tables, ie: desert, snow, grass, ruins). EDIT: 30mm bases are available from Impact Miniatures: www.impactminiatures.com Terminator Legs - there are 5 basic pairs available. Power Armour Torso - (front and back) Head 2 matching Backpacks 2 Terminator Shoulder Pads - left and right Right Arms - one power armour arm one terminator arm. The terminator arm should either be a Thunder Hammer arm or Storm Bolter arm (preferred). Left Arms - one power armour gripping arm one terminator Storm Shield arm. Bolter - standard, but the AoBR bolters are very nice because they come with a hand attached, and are slightly slimmer, so fit across the chest nicely. Acessories - pouches, purity seals, grenades - important for WYSIWYG, but also helps conceal less than perfect sculpting if placed properly. Plasticard - available in A4 sheets, generally the thinest you can get. http://www.masteroftheforge.com/files/images/actualscaletutorial/01.jpg Tools Required Greenstuff Superglue Scalpel (not a craft/stanley knife, but a scalpel) - the GW knife, is one of the best I've used (although there are probably better ones out there). The scalpel blade is great for sculpting as well as cutting. Replacement Scalpel Blades - cheap enough to get hold of, I bought a few hundred for next to nothing on ebay. Maintaining a sharp clean blade is essential, I usually swap my blades every few days. Needle Files - flat (rounded, circular are optional). Pin Vice - plus various drill bits. Clippers - also optional pliers. Clay Shapers -soft rubber tipped tools in various shapes and sizes - VERY IMPORTANT TOOL Wet & Dry Paper - (fine grades) Paperclips http://www.masteroftheforge.com/files/images/actualscaletutorial/02.jpg Greenstuff When mixing your Greenstuff, make sure you have a clean work surface and clean hands, as any dust, plastic shavings, stray hairs, etc, will affect the quality of the putty. Ideally gloves would be recommended, but I personally never use them, and haven't had any problems myself. I typically cut a strip from the roll, small amounts at a time. Before mixing the yellow and blue components make sure to cut away the putty in the middle where the yellow and blue meet, otherwise you will get lumps in your mix. I myself used lumpy Greenstuff for years until someone told me I needed to remove the putty that had already slightly cured due to contact. It seems obvious now, but not at the time. I tend to favour a 2:1 ratio of yellow to blue for most areas of sculpting. It takes longer to cure, but is softer and generally allows a smoother finish. if you are sculpting something that requires sharp details instead, then using more blue would be recommended. http://www.masteroftheforge.com/files/images/actualscaletutorial/03.jpg http://www.masteroftheforge.com/files/images/actualscaletutorial/04.jpg Building the Legs The legs should always be your starting point. Begin by triming the "hip plates" from the terminator legs. I use clippers to snip them off (beware flying plastic), trying to keep as much of the thighs intact as possible. I then clean them up with a scalpel. The belt and thighs will be sculpted over but it's good practice to keep the components clean and tidy. I forgot whilst building the example, but now is a good time to carefully remove the existing belt buckle (usually a skull or crux shape). http://www.masteroftheforge.com/files/images/actualscaletutorial/05.jpg http://www.masteroftheforge.com/files/images/actualscaletutorial/06.jpg http://www.masteroftheforge.com/files/images/actualscaletutorial/07.jpg Link to comment https://bolterandchainsword.com/topic/192140-modelling-actual-scale-space-marines/ Share on other sites More sharing options...
Lamenter Posted February 9, 2010 Author Share Posted February 9, 2010 Basing Before sculpting anything, we need to attach the legs to the base, as this gives us something to hold onto. First cut two small pieces of plasticard and glue them to the bottom of the feet. These "spacers" provide a little added height, but are there to allow us to give our Space Marine bigger more substantial boots. Next you will need to pin the legs to the base. This is optional, but if you're going to do something you may as well do it properly. Pinning it will mean it'll never come off it's base when you inevitably drop it. I also find plasticard rarely bonds very well when glued, so this is really to be sure. If you want to cut corners one pin will be sufficient. You'll need a drill bit roughly the same width as paper clip wire. Drill into the bottom of the feet, through the plasticard. Trim down a paperclip into 2 straight lengths of wire and glue them into the holes leaving about half an inch sticking out. I have found paperclips to be the best source of pins. They're very available, cheap, and just the right amount of give, to allow you to bend them over with your fingers but without weakening them. Drill two holes into your chosen base (30mm used in the example) and slot the pins in, gluing the base of the feet (the plasticard) to the base. Once the superglue has dried, bend over the extruding pins 90 degrees. There should now be a slight gap between the feet and the base thanks to the plasticard spacer. http://www.masteroftheforge.com/files/images/actualscaletutorial/08.jpg http://www.masteroftheforge.com/files/images/actualscaletutorial/09.jpg http://www.masteroftheforge.com/files/images/actualscaletutorial/10.jpg http://www.masteroftheforge.com/files/images/actualscaletutorial/11.jpg http://www.masteroftheforge.com/files/images/actualscaletutorial/12.jpg http://www.masteroftheforge.com/files/images/actualscaletutorial/13.jpg http://www.masteroftheforge.com/files/images/actualscaletutorial/14.jpg http://www.masteroftheforge.com/files/images/actualscaletutorial/15.jpg Link to comment https://bolterandchainsword.com/topic/192140-modelling-actual-scale-space-marines/#findComment-2280584 Share on other sites More sharing options...
Lamenter Posted February 9, 2010 Author Share Posted February 9, 2010 Onto the Sculpting My approach to applying Greenstuff to the model is almost always to apply too much and remove the excess. This makes a smooth finish much more achievable. If you where to find you didn't have enough Greenstuff for a particular area of sculpting and tried to add more, it becomes quite difficult to smooth two lumps together without a seam showing. Whereas it's actually very simple to remove excess putty from an area. Starting with the calves, add a ball of Greenstuff, and using your largest (flat shaped) clay shaper start to flatten the the ball out across the surface of the calf area. The clay shaper shown here is a Soft, Size 6 (from Royal Sovereign Ltd UK). I imagine other manufacturers use the same classifications. The clay shapers I use come in three different stiffnesses - soft (white), firm (grey) and extra firm (black). Make sure to keep the tip of the clay shaper wet at all times, to reduce fiction on the Greenstuff. Concentrate on getting the shape (curve) of the putty right in one direction only (ie: horizontally). You will have excess Greenstuff at the top, bottom and sides of the calf, this is fine. Next take your scalpel (making sure it is wet), and carefully trim away the excess Greenstuff from the sides. Don't worry if it's a little rough, it'll clean up. Then carefully cut away the excess at the top and bottom, and you should be left with a rough looking but filled in calf. Finally clean up the edges by smoothing them with a clay shaper (I use a smaller firm tipped one for this). Repeat this on the other leg. You may want to wait for the first to firm up before moving onto the second, just because you'll inevitably damage the sculpting while it's soft. If you're working on multiple models, it's much easier to work on one section at a time. I normally allow at least 3 hours curing time, although it can often take twice as long, depending on how much yellow was in the Greenstuff mix. http://www.masteroftheforge.com/files/images/actualscaletutorial/16.jpg http://www.masteroftheforge.com/files/images/actualscaletutorial/17.jpg http://www.masteroftheforge.com/files/images/actualscaletutorial/18.jpg http://www.masteroftheforge.com/files/images/actualscaletutorial/19.jpg http://www.masteroftheforge.com/files/images/actualscaletutorial/20.jpg http://www.masteroftheforge.com/files/images/actualscaletutorial/21.jpg http://www.masteroftheforge.com/files/images/actualscaletutorial/22.jpg http://www.masteroftheforge.com/files/images/actualscaletutorial/24.jpg http://www.masteroftheforge.com/files/images/actualscaletutorial/25.jpg http://www.masteroftheforge.com/files/images/actualscaletutorial/26.jpg http://www.masteroftheforge.com/files/images/actualscaletutorial/27.jpg http://www.masteroftheforge.com/files/images/actualscaletutorial/28.jpg Link to comment https://bolterandchainsword.com/topic/192140-modelling-actual-scale-space-marines/#findComment-2280590 Share on other sites More sharing options...
Lamenter Posted February 9, 2010 Author Share Posted February 9, 2010 Boots Filling in the sole of the boots is fairly simple. Roll out a thin sausage of Greenstuff and wrap it around the base of the foot. Using a small firm clay shaper push the putty into the gap. Keeping the clay shaper wet, smooth it into the existing shape of the foot. You will probably need to cut away excess Greenstuff with your scalpel, and scrape away some from the base itself. Try to keep it a clean sharp finish. http://www.masteroftheforge.com/files/images/actualscaletutorial/29.jpg http://www.masteroftheforge.com/files/images/actualscaletutorial/30.jpg http://www.masteroftheforge.com/files/images/actualscaletutorial/31.jpg Thighs Before moving onto the thighs, be sure the calves are firmed up, and won't accidentally get messed up. The thighs are a tricky area to work on, but with a little practice become a lot easier. Start by rolling out another sausage of Greenstuff. You will have to try and judge the thickness, but always use more than you think you'll need. Wrap the putty all the way around the thigh, trimming off the excess. Just as with the calves, use a wet tipped clay shaper and press the Greenstuff into the approximate shape of the thigh, until all the plastic is covered. If you have too much Greenstuff (ie: the thighs are massive), carefully trim some off with a wetted scalpel. Concentrate on getting the "roundness" right as the excess Greenstuff around the back of the knee and top of the thigh will be trimmed away afterwards. This is probably the most difficult area of the conversion, but have patience. Be prepared to spend time smoothing and shaping. Don't expect it to be perfect straight away, you may have to "tinker" for a little while to get the mass, shape and smoothness just right. As with the calves once the shape is there and you've cut away all excess Greenstuff from the top and bottom of the thigh, you can clean up the edges with a flat edged (wet) clay shaper. I can't emphasize enough the importance of keeping tools wet when shaping Greenstuff. OPTIONAL: Instead of water (saliva is also a less hygienic option), you may want to try very tiny amounts of Vaseline on your clay shapers and scalpel. I personally don't find it necessary, but it is an option. I've also heard of people adding small amounts of Vaseline to the Greenstuff when mixing it, that apparently offers a smoother finish. I've not yet tried it myself, but it's certainly something worth experimenting with. http://www.masteroftheforge.com/files/images/actualscaletutorial/32.jpg http://www.masteroftheforge.com/files/images/actualscaletutorial/33.jpg http://www.masteroftheforge.com/files/images/actualscaletutorial/34.jpg http://www.masteroftheforge.com/files/images/actualscaletutorial/35.jpg http://www.masteroftheforge.com/files/images/actualscaletutorial/36.jpg http://www.masteroftheforge.com/files/images/actualscaletutorial/37.jpg http://www.masteroftheforge.com/files/images/actualscaletutorial/38.jpg Link to comment https://bolterandchainsword.com/topic/192140-modelling-actual-scale-space-marines/#findComment-2280592 Share on other sites More sharing options...
Lamenter Posted February 9, 2010 Author Share Posted February 9, 2010 Torso The next step requires careful removal of the belt buckle from the front of the power armour torso component. Cutting it out with a scalpel (clippers are too destructive), you will also need to remove all the detail below the chest plate.Save the buckle for later.Now mix yourself a small ball of Greenstuff (I use plenty of blue so it'll cure faster) and sandwich it between the back and what remains of the front torso. The Greenstuff allows you to leave approximately a 1mm gap between the too components (that would normally be glued together). Put this to one side and allow to cure. Once it has firmed up, pull it apart, and then glued it back together. The Greenstuff itself rarely has enough of a bond to hold the torso together so gluing is necessary. By adding this space, we've extended the depth of the model's torso, next we need add to the torso's height (width extension is unnecessary because of the mass that the shoulders will add to the model). Roll out another thin sausage and place it along the underneath of the chest piece (where we removed the original abdomen and belt). This Greenstuff needs to be smoothed and shaped (you guessed it, using your clay shaper) so it extends the chest plate downwards. Don't worry too much about this if you can't quite get it right as it will most likely be hidden from view anyway.The gap between the front and back of the torso also needs filling, most importantly around the collar. There's no easy way around this other than practice, but in the end the results are worth it. http://www.masteroftheforge.com/files/images/actualscaletutorial/42.jpg http://www.masteroftheforge.com/files/images/actualscaletutorial/43.jpg http://www.masteroftheforge.com/files/images/actualscaletutorial/44.jpg http://www.masteroftheforge.com/files/images/actualscaletutorial/45.jpg http://www.masteroftheforge.com/files/images/actualscaletutorial/46.jpg http://www.masteroftheforge.com/files/images/actualscaletutorial/47.jpg Belt, Head & Assembly Now take the original belt buckle you cut from the torso and glue to the legs, where you cut away the terminator legs buckle. Making another thin sausage of Greenstuff and wrap it around the existing belt, as we need to widen the waist. Using your clay shaper, flatten and square off the Greenstuff, so that it resembles the original belt but bigger. Again this is one of the elements you don't have to worry about getting perfect, as there are plenty of accessories that can be used to cover up dodgy sculpting, without looking out of place. Take your chosen head (in this case a helm) and trim the neck off. Take a small ball of Greenstuff that will be a replacement neck and press the head onto the torso. Make sure as to have the back of the helm pushed as far back as possible so it's touching the collar. This helps to give the impression of the large chest jutting out. NOTE: Although in this example I've attached the head about halfway through the build, I'd advise leaving the head till last. The direction the head is facing can dramatically alter a figure's suggested pose. Leaving it till last allows more control over the finished pose. Regardless, I suggest not gluing the head in place and allowing the Greenstuff to hold it in place. It'll be a strong enough bond to hold it but will make it easier to remove if you want to reposition, swap or remove to paint. You can always glue it in place later. Next up is to attach the torso to the legs. The key to getting this right is judging the correct distance between the bottom of your extended chest plate and the belt buckle. There needs to be enough space to add the abdominal power cabling. In this example I trimmed a little off the top of the legs before gluing on the torso, leaving a 2-3mm gap. This is something you'll have to judge for yourself, and will depend on how much you've extended the chest plate. TIP: When making multiple Actual Scale Space Marines, have one that are completely satisfied with act as a guide for the rest. I still use the second conversion I did as the comparison for all my other Space Marines, ensuring everyone of them is the same height. Before moving on, the abdomen will need to be fill and power cables added. I suggest adding the cables after the abdomen has been filled and firmed up. If posed correctly however, this area will be out of sight, so don't worry too much about getting it perfect. http://www.masteroftheforge.com/files/images/actualscaletutorial/41.jpg http://www.masteroftheforge.com/files/images/actualscaletutorial/49.jpg http://www.masteroftheforge.com/files/images/actualscaletutorial/50.jpg http://www.masteroftheforge.com/files/images/actualscaletutorial/55.jpg http://www.masteroftheforge.com/files/images/actualscaletutorial/56.jpg http://www.masteroftheforge.com/files/images/actualscaletutorial/57.jpg Link to comment https://bolterandchainsword.com/topic/192140-modelling-actual-scale-space-marines/#findComment-2280595 Share on other sites More sharing options...
Lamenter Posted February 9, 2010 Author Share Posted February 9, 2010 The Purity Seal You can of course easily remove the purity seal from the legs before starting, but because they are fairly easy to sculpt I left it on in this example. First press a small ball of Greenstuff into the correct position for the seal. Flatten it out, so it's about the right thickness (0.5 - 1mm), and trim off any excess putty till you have the appropriate sized little Greenstuff disc. Using a pointed tool (in this case an extra firm, size 0 clay shaper) to mark out a circle on the disc. Finally using either a pin or point of your scalpel, mark out the two eye sockets and nose to make a tiny skull shape in the middle of the disc. http://www.masteroftheforge.com/files/images/actualscaletutorial/58.jpg http://www.masteroftheforge.com/files/images/actualscaletutorial/59.jpg http://www.masteroftheforge.com/files/images/actualscaletutorial/60.jpg Arms & Bolter EDIT: Alternative method for arms can be found here. Assembling the arms can be quite difficult and fiddly. You'll need both pairs of arms (power armour arms and terminator arms). Start by cleaning up the components and removing the underarm power cables and weapon from the terminator arms. You'll basically be swapping out the shoulder joints, to later allow greater flexibility in positioning the shoulder pads. If you don't the pads risk stick out far too much and just looking weird. Cut the shoulder joint off of each of the four arms, and the gripping hand from the left power armour arm. Throw away the terminator shoulder joints and the power armour arms. Next up, take the the bolter (handle removed) and attach it to the right terminator arm. You now have to attach the power armour shoulder joints and terminator arms to the torso. I recommend a trial run with Blu-Tack just to see the fit. Gaps are most definitely to be expected, but can easily be filled later. I suggest gluing the shoulder joints on first, the the bolter arm across the chest (it will be touching the chest plate) and finally the left arm. If you attach the left arm and gripping hand last you can make sure they fit nicely under the bolter. http://www.masteroftheforge.com/files/images/actualscaletutorial/51.jpg http://www.masteroftheforge.com/files/images/actualscaletutorial/52.jpg http://www.masteroftheforge.com/files/images/actualscaletutorial/53.jpg http://www.masteroftheforge.com/files/images/actualscaletutorial/54.jpg http://www.masteroftheforge.com/files/images/actualscaletutorial/61.jpg http://www.masteroftheforge.com/files/images/actualscaletutorial/62.jpg Link to comment https://bolterandchainsword.com/topic/192140-modelling-actual-scale-space-marines/#findComment-2280599 Share on other sites More sharing options...
Lamenter Posted February 9, 2010 Author Share Posted February 9, 2010 Shoulder Pads The shoulder pads are made using terminator shoulder pads. There are multiple methods for making these but I favour the plasticard strips route because it gives a nice sharp finish to a noticeable element of the finished model. Although you can use two plain shoulder pads (ie: 2 right hand pads), most of us can't afford to only use them, so in the example I took a left hand shoulder pad and removed the Crux Terminatus. I did this by cutting away the bulk with a scalpel, filing and finally smoothing off with Wet&Dry paper. At this point you should also remove the "sticky out bit" from the bottom edge of each pad. Next up you will need to cut a strip of plasticard 1.5-2mm wide (thinest plasticard you can get) to create the new trim of the pad. Cut that strip into four pieces that will be more than long enough to wrap around the edges. For each strip, apply a tiny amount of super glue to the center of the edge you are applying the plasticard to and attach the strip (making sure it is parallel to the edge of the pad). Allow this to dry. Now bend the plasticard around the edge of the pad and glue in place. On each pad the strips will overlap at the corners. The tricky part here is to trim them down so there is no overlap and they're nice and tidy. There's no easy way to do this, and on a couple of occassions I've had to resort to Greenstuff to clean up the corners. It is generally a good idea to add Greenstuff to the inside of the pad edge, to help give the plasticard something to bond too and fill the gaps. http://www.masteroftheforge.com/files/images/actualscaletutorial/63.jpg http://www.masteroftheforge.com/files/images/actualscaletutorial/64.jpg http://www.masteroftheforge.com/files/images/actualscaletutorial/65.jpg http://www.masteroftheforge.com/files/images/actualscaletutorial/66.jpg http://www.masteroftheforge.com/files/images/actualscaletutorial/68.jpg http://www.masteroftheforge.com/files/images/actualscaletutorial/69.jpg http://www.masteroftheforge.com/files/images/actualscaletutorial/70.jpg http://www.masteroftheforge.com/files/images/actualscaletutorial/71.jpg http://www.masteroftheforge.com/files/images/actualscaletutorial/72.jpg Link to comment https://bolterandchainsword.com/topic/192140-modelling-actual-scale-space-marines/#findComment-2280601 Share on other sites More sharing options...
Lamenter Posted February 9, 2010 Author Share Posted February 9, 2010 Back Pack More than any other element, the widened backpacks, seem to have the greatest split on opinion on most forums I've post these conversions on. Some like them, some hate them, personally I think it's a very important (but subtle) part of the conversion. The best conversions are those that aren't instantly recognizable as conversions. The widened backpacks help maintain the illusion that these are regular Space Marine models. In the example here I didn't notice till half way through that the two backpacks I used weren't the same. Ideally use matching backpacks. Makes it a lot easier. This is pretty straightforward. Start by removing any iconography, in the example there was a skull emblem on one of the backpacks that I removed and later added back on. Using clippers, chop off opposite sides of each backpack. Using you scalpel neaten up the edges so that the two backpacks fit together nicely. Glue. Filling the gaps doesn't need to be complicated. With your clay shaper, you should now be able to recreate a smooth surface. Reapplying any iconography you may have removed is an easy way of covering gaps or dodgy sculpting. However, the cleaner and tidier you can trim these down with your scalpel the less filling/covering will be needed. http://www.masteroftheforge.com/files/images/actualscaletutorial/73.jpg http://www.masteroftheforge.com/files/images/actualscaletutorial/74.jpg http://www.masteroftheforge.com/files/images/actualscaletutorial/75.jpg http://www.masteroftheforge.com/files/images/actualscaletutorial/76.jpg http://www.masteroftheforge.com/files/images/actualscaletutorial/77.jpg Attaching Shoulder Pads Attaching the shoulder pads is very simple. Add a small ball of Greenstuff to the shoulder joint. Wet the inside of the pad, and press it onto the Greenstuff, adjusting the position until it looks right - then remove the pad. You'll be left with an impression of the inside of the pad that will fit them perfectly once glued on. Plus you've been able to position the shoulder pad quite freely, into the best position. Cut away any excess Greenstuff that will stick out from the side or underneath of the shoulder pad, and allow to cure. Attach pads and backpack. http://www.masteroftheforge.com/files/images/actualscaletutorial/78.jpg http://www.masteroftheforge.com/files/images/actualscaletutorial/79.jpg http://www.masteroftheforge.com/files/images/actualscaletutorial/80.jpg http://www.masteroftheforge.com/files/images/actualscaletutorial/81.jpg Link to comment https://bolterandchainsword.com/topic/192140-modelling-actual-scale-space-marines/#findComment-2280603 Share on other sites More sharing options...
Lamenter Posted February 9, 2010 Author Share Posted February 9, 2010 Accessories & Finish Finally, add your purity seals, bolt pistol holsters, pouches, scrolls, grenades, etc. You can use these, as I've already mentioned to cover less than perfect elements of the conversion (ie: the example model has a purity seal on his left shoulder pad to cover an unsightly gap in the pad trim). http://www.masteroftheforge.com/files/images/actualscaletutorial/83.jpg http://www.masteroftheforge.com/files/images/actualscaletutorial/84.jpg http://www.masteroftheforge.com/files/images/actualscaletutorial/85.jpg http://www.masteroftheforge.com/files/images/actualscaletutorial/86.jpg Voila! You have a finish Actual Scale Space Marine. Link to comment https://bolterandchainsword.com/topic/192140-modelling-actual-scale-space-marines/#findComment-2280605 Share on other sites More sharing options...
Terrible_Trygon Posted February 28, 2010 Share Posted February 28, 2010 I like it. It's fool proof. Link to comment https://bolterandchainsword.com/topic/192140-modelling-actual-scale-space-marines/#findComment-2300131 Share on other sites More sharing options...
renegadewarp Posted March 3, 2010 Share Posted March 3, 2010 any updates? :eek Link to comment https://bolterandchainsword.com/topic/192140-modelling-actual-scale-space-marines/#findComment-2302665 Share on other sites More sharing options...
hidje Posted March 3, 2010 Share Posted March 3, 2010 very nice tut :) Link to comment https://bolterandchainsword.com/topic/192140-modelling-actual-scale-space-marines/#findComment-2302832 Share on other sites More sharing options...
Lamenter Posted March 3, 2010 Author Share Posted March 3, 2010 any updates? :blush: nope :blush: if I do anymore tutorials they'll have their own thread. I may do an Actual Scale Terminator tutorial later on. Link to comment https://bolterandchainsword.com/topic/192140-modelling-actual-scale-space-marines/#findComment-2303120 Share on other sites More sharing options...
Brother Martemis Posted March 3, 2010 Share Posted March 3, 2010 thanks for the tutorial, i am currently pilfering some of your ideas you used on your grey night chaplain, to do a blood ravens librarian hope you don't mind (he says after the fact). will hopefully be posting pics of the body and legs soon, haven't started the arms yet, but know what they will (or should) look like. but back to the tut, its clear, which helps, but the best bit is i now know what tools i need, which is the one thing that i was stuck on, but was too stubborn to ask. Link to comment https://bolterandchainsword.com/topic/192140-modelling-actual-scale-space-marines/#findComment-2303292 Share on other sites More sharing options...
Defender of Ultramar Posted March 4, 2010 Share Posted March 4, 2010 Brother Lamenter, Thank you very much for posting this. Excellent work as always. Keep it up. Link to comment https://bolterandchainsword.com/topic/192140-modelling-actual-scale-space-marines/#findComment-2304211 Share on other sites More sharing options...
pueriexdeus Posted April 21, 2010 Share Posted April 21, 2010 I find your tutorial very helpful. Now how can I actual size a Terminator. I'm planning on a kit bash of Commander Cullen to make my Belial. Any input? Link to comment https://bolterandchainsword.com/topic/192140-modelling-actual-scale-space-marines/#findComment-2371279 Share on other sites More sharing options...
Kay Posted April 21, 2010 Share Posted April 21, 2010 Wow, delicious guide. This is a subject that has been treated a lot, but not so much in depth as you just did, kudos! The only downside i see to these kind of projects is, average price for ONE miniature? And for a squad?...and for an army... Dammit, wish i were rich... Link to comment https://bolterandchainsword.com/topic/192140-modelling-actual-scale-space-marines/#findComment-2371785 Share on other sites More sharing options...
Lamenter Posted May 2, 2010 Author Share Posted May 2, 2010 I find your tutorial very helpful. Now how can I actual size a Terminator. I'm planning on a kit bash of Commander Cullen to make my Belial. Any input? Scaling up a Terminator is not so easy, but at least you only need a Terminator as the base model. It is mostly Greenstuff work and patience. http://www.masteroftheforge.com/images/october09/Terminator1.jpg I've done 6 of these so far, and plans to do more in the future, so a tutorial may be possible. Link to comment https://bolterandchainsword.com/topic/192140-modelling-actual-scale-space-marines/#findComment-2385256 Share on other sites More sharing options...
Adam In Terminator Armor Posted June 28, 2010 Share Posted June 28, 2010 can you post comparative pictures of GW standard models and the conversions?? Just for a reference please Link to comment https://bolterandchainsword.com/topic/192140-modelling-actual-scale-space-marines/#findComment-2447638 Share on other sites More sharing options...
Tanhausen Posted June 28, 2010 Share Posted June 28, 2010 Neat step by step tutorial... it certainly is a plus when you take so much effort into taking so many pics s that nobody gets "lost" in the process. Just to be sure (some language issues ;)), the objective of building this model is just so the overall effect is in proportion (heads vs arms vs legs and so on)... right? Link to comment https://bolterandchainsword.com/topic/192140-modelling-actual-scale-space-marines/#findComment-2447902 Share on other sites More sharing options...
mitchell93 Posted June 29, 2010 Share Posted June 29, 2010 Please make a tutorial for your true scale terminators Link to comment https://bolterandchainsword.com/topic/192140-modelling-actual-scale-space-marines/#findComment-2448822 Share on other sites More sharing options...
Lamenter Posted June 29, 2010 Author Share Posted June 29, 2010 can you post comparative pictures of GW standard models and the conversions?? Just for a reference please Here you go: http://www.masteroftheforge.com/images/oct...orcomplarge.jpg All my scaled up conversions conform to these scales. As a general guide they stand 5mm taller than their smaller counterparts. Just to be sure (some language issues :)), the objective of building this model is just so the overall effect is in proportion (heads vs arms vs legs and so on)... right? Well there are a number of reasons. 1. Better proportions within the model itself (ie: the head isn't so ridiculously big). This is what I would call Truescaling, whereby the model is made to be accurately proportioned. First it is important to understand that GW's miniatures are "heroic" 28mm scale. The "heroic" means they are more bulky and less delicate than the more accurate tradition military miniatures. Truescaling effectively removes the "heroic" element to the scale. This doesn't necessarily require scaling up the model, as a smaller head would begin to achieve the same aim. Many truescale conversions will reposition the legs into a more natural pose which happens to add a little height too. This image on CMON is a great example of using a smaller head to great effect. 2. More accurately scaled when stood next to a normal human model (Guardsman for example). This is what Doghouse coined as Actual Scale. Very simply put, bigger marines. The main point of reference is other "normal" scaled models. 3. What I like to call Artscale Conversions. Closer representations of what we are led to believe Space Marines should look like according to GW's own artwork and fiction. Artwork is the main point of reference. My own conversions are done also for the simple fact that I want unique cool looking models to put down on the table. Link to comment https://bolterandchainsword.com/topic/192140-modelling-actual-scale-space-marines/#findComment-2448858 Share on other sites More sharing options...
Tanhausen Posted June 30, 2010 Share Posted June 30, 2010 @Lamenter Thank you very much for such a thorough (probably mispelled ;)) explanation! I had never seen a true scale finished conversion... and certainly not with so many comments! If you are going for a unique model or a painting competition, I would understand taking all this work (how long does it take you to build something like that? 4-6 hours?)... but only thinking of an average marine army (70 models?)... I get the shivers! Anyhow, thanks for putting the time to give such a neat background! Link to comment https://bolterandchainsword.com/topic/192140-modelling-actual-scale-space-marines/#findComment-2449628 Share on other sites More sharing options...
Lamenter Posted June 30, 2010 Author Share Posted June 30, 2010 @Lamenter Thank you very much for such a thorough (probably mispelled :D) explanation! Don't you mean misspelled? :) At the end of the day I do these because I'm a perfectionist and I want something that will be either unique or very rare. Link to comment https://bolterandchainsword.com/topic/192140-modelling-actual-scale-space-marines/#findComment-2449681 Share on other sites More sharing options...
Rider-75 Posted July 27, 2010 Share Posted July 27, 2010 going to give a 5man squad a go.... but before i do - what sort of time scale to each of these take? i may revise my ambitions and just do the one......lol!! Link to comment https://bolterandchainsword.com/topic/192140-modelling-actual-scale-space-marines/#findComment-2473485 Share on other sites More sharing options...
Recommended Posts
Archived
This topic is now archived and is closed to further replies.