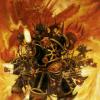
BrotherJim Posted August 8, 2013 Share Posted August 8, 2013 stage one complete, could someone please tell me how to resize the image, I've read the tutorial for linking/hosting pictures, but im not exactly what you might call techsavvy holy emperor he's huge I was first introduced to the hobby at the dawn of second edition and when necromunda was released, I gamed and painted abit as a youngster but didn't totally commit to the hobby until the last few years or so. first and foremost for me the attraction has always been about the miniatures and the artwork, I worship Jes Goodwin as the God-Emperor himself. I have about 2000pts of space wolves painted (still very wip) (haven't played a game yet) but this log right here will focus on my blood angels, my goal with these guys is to actually highlight them lol. the main reason I chose blood angels is so I could have access to the kits, I may consider doing a successor chapter, or even a diy. with this guy (above) and the others I have at the same stage, I kinda let myself down a lot with the details (haven't done lighting claws/eyes etc) my main excuse here is that I want them to be green and I don't know the recipe/ have the colours, so yeah just being lazy atm unlike my wolves I am actually going to "finish" these guys before I move on to the next batch comments/criticisms most welcome, there are more to come I just don't want them to be so MASSIVE!!! Link to comment Share on other sites More sharing options...
Telencephalon Posted August 8, 2013 Share Posted August 8, 2013 I salute you, brother! We're apparently going for the same colour schemes of the same chapter. You gotta love the old-school orange highlights! He's painted to a great tabletop standard, an army of angels like these will look very striking on the table! Looking forward to seeing more! Link to comment Share on other sites More sharing options...
Xenith Posted August 8, 2013 Share Posted August 8, 2013 Great looking marine, what kit are those legs from? Space Wolf? Link to comment Share on other sites More sharing options...
Laborious Posted August 8, 2013 Share Posted August 8, 2013 Very nice start, sir! If you feel like putting in the extra work across the force, I would add a minute amount of white to your highlight colour and just sparingly apply it to the very extreme tips of the model for that extra pop. One thing i would certainly do however is touch up that left gauntlet, the highlighting is a little bit thick compared to the rest of our excellent work. :) Really good work so far, and i shall be following you along on your journey. Good luck! :) Link to comment Share on other sites More sharing options...
BrotherJim Posted August 9, 2013 Author Share Posted August 9, 2013 thanks a bunch fellas, telencephalon, yours are much nicer than mine, saw you wip last week but forgot to comment, sorry about that! your minis look fantastic! they are blended yes? are you using only two colours? do you use two brushes, one to place the paint and the other to spread it around? I understand layering and blending in theory but in practice I cannot even begin to imagine... I have some faces to paint and yeah, no idea where to even begin.... feel free to ignore me, this should probably all be asked in your wip anyway! i'll come hassle you there! I am basically doing only edge highlighting first 1/1 evil sunz/blazing orange, around all the edges, then straight blazing orange on the toppermost edges, then I add some vomit brown (which kinda made it really dull, so I dropped in a bit of yellow) only for spot highlights... I found the first step is the most essential, when I apply it I can hardly see it at all, but I found this allows me to paint very broad lines, to make the progression to blazing orange easier on the eyes xenith thanks mate, they are from the blood angels kit, this guy was originally going to be a raven guard, he was basically an experiment in how well I could shave of details and file up a smooth finish, (had to backfill the legs a little bit) went from blade to diamond file, to the gw files, to the gw emery boards, his shoulder pad also was the blood angels one, with the smooth edges and giant blood drops, his right lighting claw comes from the space wolf sprue, and his left is obviously from the commander kit.... still waiting on some guitar string to finish him properly Laborious thanks a lot friend! you are spot on about the lighting claw, I didn't tidy up the highlights at all, wasn't sure how to highlight that bad boy to begin with so I thought "more is better than less, I can always correct it later" obviously failed to correct it *whoops* im a little cautious about adding white to colors, back in the day white dwarf would always just say, add black or white, to shade or highlight, I watched my friend attempt to this and it would completely kill the colour and drive him crazy, then in the magazine you would see pictures of vajjelo bottles in the back ground lol I hear what you're saying though, I may just use yellow also as a side note, in the citadel "how to paint minitures" they discourage using black or white to mix colours and im like "it was you people that started all this!!!" and a teaser, very much wip Link to comment Share on other sites More sharing options...
BrotherJim Posted August 9, 2013 Author Share Posted August 9, 2013 hmmm pictures are still massive, any ideas folks? I may just keep spamming them until someone takes pity on me right side another veteran some of the pictures have been played around with in my windows media thingamagig, some not, some with flash some without, still trying to iron out the best system... but you should have seen the photos I took last week, they were horrible, hooray for improvement! again with these guys really let myself down on the details, I want to do some marble effect on the storm shields, looks simple enough in the tutorial I found... we'll see Link to comment Share on other sites More sharing options...
Telencephalon Posted August 9, 2013 Share Posted August 9, 2013 Thank you a lot for the compliments! I use 4 base colours for the blend; merchite red for basecoat, blending through layering to blood red. The same thing up to fiery orange, which I also use to line the mini with. I sometimes pick out the extreme edges with a mix of golden yellow and fiery orange. The shading is done with thinned down DA green. In addition, I think one of the most important touches is the blacklining. It usually tidies up the entire paintjob. I can't stress its importance enough! For anyone that has followed my wip, they probably noticed one of the most striking features; my snail-paced rate of progress ;) It takes a long time to work your way through the entire mini in this way, I will probably not paint my entire army like that (else I'd be happy to have 1500 points painted by the time i retire). Your painting strategy is very effective, I thought you had used some shading as well! Once again, I think they are painted to a great tabletop quality and they will look great when gathered on the battlefield. If you're looking to further your knowledge of certain painting techniques (layering, painting faces etc), coolminiornot.com is a great mini-painting community with scores of articles and helpful community members! I learnt everything I know there. Link to comment Share on other sites More sharing options...
BrotherJim Posted August 9, 2013 Author Share Posted August 9, 2013 ahh yes sorry I use red or brown wash to line in the shadows, sometimes I mix them sometimes on or the other... I actually forgot to tidy the wash up so hopefully the next lot will be cleaner yeah dude, that is an insane amount of work you're putting in, at least you get great looking minis and a lot of value for money awesome that's really encouraging to hear, I love coolminiornot I only seem to get there once I run out of things to look at on the b&C, so im not there very often ;) Link to comment Share on other sites More sharing options...
Laborious Posted August 9, 2013 Share Posted August 9, 2013 Sorry, typed that post up on my phone, which i hate doing, and missed some words. :o what i meant to say was add some white to your yellow, and, as you say, yellow to your red. Really miniscule amounts though, or it'll change the colours too much. Also, leave the pictures as they are. Big pictures are actually useful. Sure, it magnifies any faults in the painting, but then that's the point isn't it? I hate plogs with tiny pictures, because when people ask for c&c it's just as hard to judge as blurry/poorly lit shots. Loving the new models, mate. Painting is even better on these. Really like the kitbashed officer with the stormshield as well. :) Link to comment Share on other sites More sharing options...
BrotherJim Posted August 10, 2013 Author Share Posted August 10, 2013 Laborious- thanks for the reply mate, I've been through your emperors children log and really like what you are doing there nice clean painting, if I could finish up my details as well as yours I would be a happy chappy haven't had a chance to read all of your fluff yet but what I did read is very evoking, will be sure to give it all a good read through and post some feedback hail to the king baby (my captain) Link to comment Share on other sites More sharing options...
BrotherJim Posted August 12, 2013 Author Share Posted August 12, 2013 okie dokie cookies! its update time! I decided to follow my good man Laborious's advice, and add some white to my yellow and go in and finish up these guys. I think the final highlight really helps the model! also I tidy'd up the highlights on the gauntlet, while I was at it I threw caution to the wind and decided to have a go at doing this guys lighting claws with the greens I have available, pretty happy with the results, though I think I was a bit heavy handed with the final highlight.. I have tried lighting effects before, with mixed results, i would appreciate some feedback. you'll notice also I completely forgot to paint the back and inside of the claws AMATUER! so before we get too far, I do realise if this guy is to be a proper veteran, he'll need a gold helmet, and probably some kind of fancy shoulder pad, rank in my army is important to me, and something I will talk about later. and for those of you playing at home, here is another member of my command squad, I originally built him as a count as tycho, but some tinkering later, he's just some nameless badass thanks for stopping in! criticism most welcome! for the Emperor! Link to comment Share on other sites More sharing options...
BrotherJim Posted August 12, 2013 Author Share Posted August 12, 2013 looking at the photos I can see all kinds of things I need to work on, I definatly need to tightien up my shadow lines with a tidy up coat, and put more effort into keeping my highlights thin... bring back the days when I would just drown the model in badab black! Link to comment Share on other sites More sharing options...
Squeaky Posted August 12, 2013 Share Posted August 12, 2013 awesome nameless badass, he's standing like he is thinking "who dies first to day then" Link to comment Share on other sites More sharing options...
BrotherJim Posted August 15, 2013 Author Share Posted August 15, 2013 thanks mate I picture him having just downed his opponent, having thereby won the day he holsters his combi-weapon and removes his helmet, saunters over placing his foot on a girder of awesomeness, inspects the dying warlord and condescending says "how did defeat you?" let me count the ways condescending is a word that is synonymous with my blood angels today I attempted to read through the blood angels codex, looking for inspiration and it kinda burned a lot of the ideas I have for the backstory behind my guys, seriously considering doing a successor chapter or even a diy for now though I will just run with my own ideas, really need to push through the horus heresy series, im only up to flight of the Eisenstein, but I find the series very inspiring so looking at my minis I decided the were far too bright (they practically glowed in the dark) and there was nothing particularly grimdark about them, if you didn't already know the were veterans of the long war, you wouldn't be able to tell just from looking at them. solution? battle damage and weathering. I decided to sponge on some boltgun metal and apply liberal amounts of soot (from the Tamiya weathering master kit) like everything I am very new to this so I think I was abit heavy handed let me know what you think, more updates soon Link to comment Share on other sites More sharing options...
BrotherJim Posted August 16, 2013 Author Share Posted August 16, 2013 ive never been good at keeping secrets I have finished building my command squad and I will present them now, this is to be the jewelled crown in my blood angels army, they will stay as wip until ive painted at least a bare minimium legal force for them to lead. a lot of my ideas behind these characters conflict with what is written in the blood angels codex, but for now im not too bothered, advice and criticism needed from you guys. suffice to say "My fluff might contradict what you envision these legions to be and how they fight or operate. Let's not get too caught up in the interpretation of these legions." since the time that I was young 40k has always been a rich land of imagination for me, one where anything is possible, im not too big on the details but I know the basics. im not very good at articulating my ideas onto paper, but i'll give it a shot *FLUFF ALERT* in my mind, Baal has always been a rich and powerful planet full of noble houses and royal lords. (think feudal japan meets A Song of Ice and Fire) the people there were artisans supreme, everything from swordsmanship, to composing music and poems, flower arranging, serving tea, the artwork itself, buildings, statues, city scapes. everything was considered an expression of self, and only those who had trained in the way and harmonized peace within themselves were allowed to express themselves artistically. above all, combat was the greatest and most valued expression of oneself. being on the swords edge between life and death, committing all of oneself to victory, the people of Baal rejoiced in life and death, and ever sought to capture that moment. the social structure went basically lord, warrior, artisan/builder, merchant, then peasants/farmer. warriors cults/monks were common, many of the noble houses often made war upon another to expand their sphere of influence. in this way it was possible for one to take up the sword and raise oneself above their birthright. of course a peasant with a sword stood no chance at all against a fully armoured lord who has dedicated his whole life to perfecting the martial arts, but nobody stopped to tell the peasants that even before the coming of Sanguinius, the people were very spiritual, believing that everything from the ant, to the tree, the water, was a expression of god, the universe and everything in it. in this way, god could be found through perfecting oneself and a strict code of ethos (bushido) was practiced by the lords and their retainers broadly speaking Duty, Honour, Loyalty, Respect/Politeness, Veracity, Tradition and Ediquette always came before oneself. it was better to die for your lord than to live for yourself. are you ready to kill? are you ready to die? are you ready to live? the the warriors of feudal baal, these amounted to the same sentiment. when Sanginius arrived, he was immeadiaty hailed as a messenger of god, who prophecies had been written about since time immemorial. he was a adopted by a certain noble house and trained in all the ways, the speed at which he learned, mastered and developed these arts was further proof to his godhood. however not all of the noble houses felt he was a god, some rejecting him outright as a demon. thus Baal was plunged into a civil war the scale of which had never been seen before. millions died and often sanginius's arrival is referred to as "the coming of the red wake", in reference to the sea of blood that was spilt in his name. after the war, the people enjoyed a time of peace and prosperity under Sanginius' rule, further developing and refining their arts enter the emperor *END FLUFF* not sure how I want technology to feature in all this, my basic idea is that the people were too busy developing theirs arts of war (murdering each other) to ever have an industrial revolution, but then could they truly attain peace if half the populace was busy working 9-5....? awyway one with the show, most of these guys are direct descentents of the noble house who first took up Sanginius' flag the blessed the sorcerer (librarian) the executioner the noble the murderer the example the righteous fury the healer (sang priest) the king the masterless, the nameless, the wanderer each character has his on little backstory, still in development building these guys was great fun, mixing and matching poses, I will talk more about them later its going to take more skill than I have to finish these guys and really do them justice, everything else is in my army is practice for them. the b&c has given my a great deal over the years, this is truly a a palace of great inspiration, haven finally given something back, im happy now to fade into anonymity... though expect more updates! comments criticisms and advide welcome, I have pinned all the arms, but the rest is just blu-tac... happy hobby! Link to comment Share on other sites More sharing options...
BrotherJim Posted August 16, 2013 Author Share Posted August 16, 2013 forgot the group shot Link to comment Share on other sites More sharing options...
Inquisitor Eisenhorn Posted August 16, 2013 Share Posted August 16, 2013 These are great conversions! I love the Blood Angels and you've done them justice here! Link to comment Share on other sites More sharing options...
Martok Posted August 16, 2013 Share Posted August 16, 2013 There is a whole lot of character in that group! Looking forward to the finished conversion (and paint for that matter). I may have missed you saying so but did you have a Lamenters project originally (i see a lot of repurposed yellow parts)? Link to comment Share on other sites More sharing options...
Laborious Posted August 16, 2013 Share Posted August 16, 2013 The weathering is not bad for a first try, mate. But it is a little overdone at present. Too much freshly exposed metal. There's no variation in the age and severity of the damage. Easy to fix though. :) If you are going to weather that heavily it's best to use a mix of colours. The weathering on my EC's is a first sponged layer of Charadon Granite, overlayed with a lighter application of boltgun metal. If you want to go even further, I've also shaded some of the larger chips with black and highlighted them with my armour highlight colour to get that nice 3d effect. Even just some glazing with black/brown ink on some of the areas of chipping will dull down the shine and provide you with some older looking damage ext to the shiny new stuff. :) The command squad looks boss, btw. :) Link to comment Share on other sites More sharing options...
Brother Heinrich Posted August 16, 2013 Share Posted August 16, 2013 Nameless badass is my favorite, that pose rocks. Link to comment Share on other sites More sharing options...
Telencephalon Posted August 16, 2013 Share Posted August 16, 2013 I actually find the battle damage quite convincing! Since space marines re-paint their battle armour after each combat, if present, it is always fresh! Though I agree with laborious in that it would look more striking if you spread it out more. Still, it already looks pretty neat from a distance! Conversions look great as well! Looking forward to seeing them in all their painted splendour. Link to comment Share on other sites More sharing options...
BrotherJim Posted August 19, 2013 Author Share Posted August 19, 2013 thanks for the comments guys, makes my day. im glad people like them :) please forgive the late reply I didn't want to bump the thread until I had something to show, but its seems that's exactly what im going to do I spent most of the weekend experimenting with lots of different things trying to come to grips with the skills I will need to finish the command squad. firstly - green stuff/milliput. as you can see I've done a simple cut and shut (pinning) on the command squad, and this has left some pretty hideous gaps. I will at the very least need to gap fill and hopefully sculpt some flexible ribbing, my experiments lead me to believe this should be do-able. but if anyone has some advice or links to good tutorials I would be most grateful, I feel like I've read them all, but you never know.... secondly - the wet pallet. this is something I have been trying to get going for a long time. the mistakes I have made in the past include, too much water, wrong type of paper etc. by process of elimination I think I am getting closer. some people say wax paper, some people say parchment paper, others still say baking paper... this is something I really want to get going as I am becoming more and more frustrated with my paints drying out, especially now that I am highlighting thirdly - battle damage. Laborious is spot on with his advice (again!) I tried to take a few shortcuts, but there is no shortcut to quality. I think in future I will sponge on boltgun, any big spots will get an underline of very dark grey, then I will highlight the top edge with my highlight colour. I may even paint within the damage with chainmail, do we think that will float? I am also considering doing some hack and slash, drilling bolt holes etc, to give the damage some extra life... but its still nice to know, doing the bare minimum (above) produces pretty nice results :) lastly I attempted to bypass my basecoats (which I am doing by brush - the pain) with the army painters pure red primer spray. while I think it is a quality product, it just didn't give the colour the same depth that 4-5 thin basecoats does. the simple (expensive) solution would be to purchase an airbrush. I do have some experience with airbrushing, and I know it is a real joy. but I am painting indoors here, so I would probably need a spraybooth too, think of the minis I could buy with that money!! but then I honestly don't think I could paint my vehicles by hand.... at the end of the day I need to remind myself that I am not a professional (though I do try to be) and I am doing this for funsies. I don't want leave you guys completely empty handed so here is a wip shot of an assault marine captain I have been thinking about for a long time. I really want a lot of jump packs in this army, and I wanted a simple blood angel who represents the "descent of angels" special rule, now that I have one of them, I am fighting of the urge to build a whole squad of them I made the mistake of leaving this guy on my desk, and so I couldn't stop messing around with him, he looks great from some angles, not so much from others, and of course, the gaps :( bane of my existence Martok - I painted them yellow just for fun, an experiment in drybrushing/washes, and to help me keep track of them Link to comment Share on other sites More sharing options...
BrotherJim Posted August 19, 2013 Author Share Posted August 19, 2013 putting these project on hold for awhile Link to comment Share on other sites More sharing options...

Recommended Posts
Archived
This topic is now archived and is closed to further replies.